How To Use Garmin/Suunto
The information in this section applies to Garmin and Suunto heart rate equipment.
Battery Information
Battery Type
Garmin and Suunto chest belts take one 2032, which is a 3-volt lithium coin cell battery.
Battery Life
- Garmin: About 1000 hours at one hour of use a day
- Suunto: About 300 hours
Battery Replacement
Note: Suunto recommends changing the battery cover and O-ring whenever the battery is changed to ensure the transmitter remains clean and water resistant. Replacement covers and O-rings can be obtained from Suunto.
Garmin and Old Style Suunto Chest Belt

- On the back of the transmitter, open the battery door by rotating it counter-clockwise.
- Remove the existing battery by pressing lightly on one edge of the battery until it pops free of the compartment.
- Wait 30 seconds. Place the new battery into the battery compartment with the positive side facing up.
- Replace the battery compartment cover and turn it clockwise until it is locked.
Suunto Comfort Belt
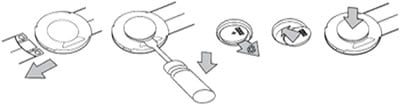
- On the back of the transmitter, gently pry the battery door open using a screwdriver.
- Remove the existing battery by pressing lightly on one edge of the battery until it pops free of the compartment.
- Place the new battery into the battery compartment with the positive side facing up.
- Replace the battery compartment cover and press it down on all edges until it snaps closed.
How To Wear
Positioning
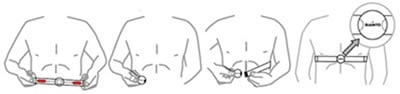
To wear the chest belt properly:
- Wet the contacts but not the area between the contacts.
- Ensure the chest belt is positioned correctly and is the proper fit:
- The logo should be right-side-up.
- Men: Position the chest belt just under your pectoral muscles.
- Women: Position the chest belt just below your sports bra.
- Fit: The chest belt should be fairly tight around the torso; just tighter than is comfortable.
Additional Tips
- If the chest belt is having trouble picking up your heart rate, try rotating the chest belt to the left side of your torso (closer to the heart). You can also try moving the chest belt higher or lower on your torso.
- Warm up, so that you are sweating a bit, before putting the chest belt on; this can help establish a connection between the skin and the contacts.
- Try using electrode gel on the contacts.
- Excessive body hair can degrade performance; shaving or moving the transmitter to a smoother area can help.
- Excessive body fat can block the signal from the chest belt. Position the transmitter in the leanest area possible, and avoid body parts, like the breasts, that are composed primarily of fatty tissue.
Pairing: Chest Belt to PM5 or PM4
Before the Performance Monitor (PM) can detect your heart rate from a chest belt, you need to pair the ID of the chest belt with your PM. If you use a LogCard or USB flash drive with your PM, your chest belt ID can be saved to that device, so you should only have to perform this pairing once. If you do not use a LogCard or USB flash drive with your PM, you will need to repeat the pairing process every time you row or ski. Before attempting to pair a chest belt with a PM4 or PM5, please ensure you are using compatible equipment.
Pairing Without a LogCard or USB Flash Drive
- Put the chest belt on, and press any button on the Performance Monitor (PM) to power it up.
- On the Main Menu, select Connect. For PM4s, or PM5s running old firmware, select More Options instead.
- Select Connect Heart Rate. Within 5–10 seconds, the PM will list identification information for any chest belt it finds. This information may include brand or model information and/or an ID number.
- Choose the ID that corresponds to your chest belt. (If you are unsure, check the chest belt ID, which is typically listed on the back of the belt.)
- Select Confirm Selection.
Pairing While Connected to the ErgData Application
- Put the chest belt on, and press any button on the Performance Monitor (PM) to power it up.
- Connect ErgData to the PM.
- Select Connect Heart Rate. Within 5-10 seconds, the PM will list identification information for any chest belt it finds. This information may include brand or model information and/or and ID number.
- Choose the ID that corresponds to your chest belt. (If you are unsure, check the chest belt ID, which is typically listed on the back of the belt.)
- Select Confirm Selection.
- On the ErgData app, select Yes to, "Remember Heart Rate Belt?"
This saves your chest belt’s ID to your ErgData application so that the PM automatically detects your chest belt in the future.
Pairing with a LogCard or USB Flash Drive
- Put the chest belt on, and press any button on the Performance Monitor (PM) to power it up.
- Insert your LogCard or USB flash drive into the monitor.
- Important: If you are using a USB flash drive, wait for the PM to display the Welcome screen with your user name before moving to the next step.
- On the Main Menu, select Connect. For PM4s, or PM5s running old firmware, select More Options instead.
- Select Connect Heart Rate. Within 5–10 seconds, the PM will list identification information of any chest belt it finds. This information may include brand or model information and/or an ID number.
- Choose the ID that corresponds to your chest belt. (If you are unsure, check the chest belt ID, which is typically listed on the back of the belt.)
- Select Remember Belt. This saves your chest belt's ID to your LogCard/USB flash drive so that the PM automatically detects your chest belt in the future.
Pairing: Garmin Watch to PM5
These instructions apply to several different Garmin watch models, including:
- Forerunner 235
- fēnix® 3
- fēnix® 5
- vivoactive HR/HR+
On the Garmin watch, select “Broadcast Heart Rate” in the settings (learn more about this on the Garmin website). Then follow instructions for pairing your watch with the PM5 below:
Pairing Without a USB Flash Drive
- Put the watch on, and press any button on the Performance Monitor (PM) to power it up.
- On the Main Menu, select More Options.
- Select Connect Heart Rate. Within 5–10 seconds, the PM will list identification information for any broadcasting watch finds. This information may include brand or model information and/or an ID number.
- Choose the ID that corresponds to your watch.
- Select Confirm Selection.
Pairing with a USB Flash Drive
- Put the watch on, and press any button on the Performance Monitor (PM) to power it up.
- Insert your USB flash drive into the monitor.
- Important: Wait for the PM to display the Welcome screen with your user name before moving to the next step.
- On the Main Menu, select More Options.
- Select Connect Heart Rate. Within 5–10 seconds, the PM will list identification information of any broadcasting watch it finds. This information may include brand or model information and/or an ID number.
- Choose the ID that corresponds to your watch.
- Select Remember Belt. This saves your watch's ID to your USB flash drive so that the PM automatically detects your watch in the future.
Pairing: Garmin Watch to PM4
These instructions apply to the following Garmin watch models:
- FR60
- FR70
- FR210
- FR310XT
- FR610
- FR910
To pair (connect) your Garmin watch with the PM4:
- The Garmin watch must be running Software Version 3.0 or higher.
- The PM4 must be running Firmware Version 313 Build 8 or higher.
- Visit www.thisisant.com for a list of watch compatibility.
Pairing Suunto: Chest Belt to t3/t3c/t3d Watch
The Suunto t3/t3c/t3d watch is programmed to "pair" with the first chest belt it detects when you push any buttons on the watch for the very first time. The watch will only work with that chest belt transmitter unless you complete a re-pairing procedure to make it work with a different chest belt.
If you are already using another Suunto chest belt (such as the one that came with your PM4), be sure to place this chest belt near the t3/t3c/t3d watch before using your watch for the first time.
Important: Make sure that the chest belt that came with the t3/t3c/t3d watch (and any other Suunto chest belts) are placed more than 40 ft away from the t3/t3c/t3d watch when you first use the watch. This will ensure that your t3/t3c/t3d watch pairs with the chest belt you will be wearing.
Pairing Steps
- Remove the battery from the chest belt.
- Short-circuit the - and + metal plates in the battery compartment by connecting them with a metal instrument.
- Select PAIR in the Training menu of your Suunto t3/t3c/t3d.
- Select Hr belt. The message 'TURN ON NEW DEVICE' is displayed.
- Insert the battery in the battery compartment and wait for acknowledgment. Within 30 seconds, one of two messages will appear: either 'PAIRING COMPLETE,' or, if the pairing failed, 'NO DEVICES FOUND.'
- If the pairing is successful, close the battery compartment cover. If the pairing fails and no devices can be found, remove the battery and repeat steps 2–5.