What is the Best Damper Setting for Me?
Jan 3, 2025
Share

If you have ever used a Concept2® RowErg® or SkiErg®, you have likely wondered, “What is the best damper setting to use?”
The truth is, there is no one-size-fits-all answer. The ideal damper setting depends on the athlete, the desired workout intensity, distance, or duration. While we cannot give you a definitive answer, we can provide the information and tools to help you find the best damper setting for you and your needs.
Let’s start with the basics
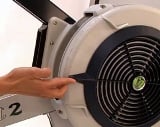
All Concept2 machines use the same flywheel technology with an adjustable lever on the side that allows you to change the damper setting anywhere from 1 to 10. The adjustable lever on the side of the flywheel allows you to create a customizable workout experience. This setting controls the amount of airflow in and out of the flywheel, affecting the workout experience.
A damper setting of 1 allows minimal airflow, so the flywheel spins freely, and continues spinning between strokes. On the other hand, a damper setting of 10 allows for maximum airflow, requiring more power to get the flywheel spinning and causing it to slow down quickly between strokes due to increased volume of air. Compared to a damper setting of 1, it is much harder to get the flywheel spinning than when the damper is set to 10. However, a higher damper setting (for example, 10) is not necessarily better, harder, or faster than a lower setting (for example, 1) - it depends on your specific workout goals and preferences.
So, what does damper setting mean for your workout?
A lower damper setting (3 or below) can make it easier to increase your stroke rate and experience less fatigue compared to a higher damper setting. If you are going for longer distances, try using a lower damper setting. The higher stroke rate may also help you achieve faster times over certain distances, but you will need to focus on being quick and light at the catch when on the RowErg and at the start of the SkiErg movement.
A higher damper setting (6 and above) can allow your legs and arms to generate more force at the start of the movement and to generate more speed at a lower stroke rate. This can benefit those doing short, intense intervals or all-out efforts. However, it can be difficult to sustain proper technique before you start compensating.
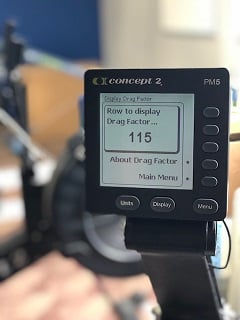
The Performance Monitor (PM) measures the rate of deceleration of the flywheel during the run-down of every stroke and takes environmental conditions into account. This rate of deceleration is called the Drag Factor. On your next stroke, the PM uses the Drag Factor to determine how much work you are doing from the speed of the flywheel. In this way, your true effort is calculated regardless of damper setting. This self-calibration is what allows us to compare scores between different Concept2 ergs, making events like indoor racing and the online world rankings possible and repeatable.
Try these tips to start
On the RowErg, we recommend starting with a damper setting between 3 and 5. This is a great balance of not too much and not too little drag and is great for a wide range of workouts - whether your session is long or short, easy, or intense. In fact, this is the damper setting most records are set at, making it an excellent starting point. From there, you can fine-tune the damper to find what works best for your specific distances and workout routines.
On the SkiErg, with a little experimentation, you will find the damper setting that works best for you. We recommend starting out on a damper setting of 3 or lower. Resist setting the damper lever too high; this can exhaust your muscles before you reap the full cardiovascular benefit that exercising on the SkiErg provides. The PM also gives you immediate, accurate feedback on each stroke so that you can monitor your performance and determine when you get your best results.
On a SkiErg with a damper setting of 1-4, it will feel like you are navigating fast snow conditions on rolling terrain. On a damper setting of 5 and above, the SkiErg will feel like you are skiing in slow conditions and with an uphill resistance. Regardless of the setting, you will need to increase your effort to increase your intensity.
How do you know what is right for you?
To find what damper setting works best for you, we recommend doing the same distance, time, or intervals. Play with the damper setting and see how it affects your time, pace, and effort. Once you find what damper setting works best for you, apply it to the best of your ability!
Another way you can experiment with the damper setting is the following workout. Try rowing one minute of work followed by one minute of rest, changing the damper from one to ten on each work segment. Start each work minute from a stopped flywheel and maintain a constant strokes per minute. What feels different if anything? Does the output change?
The key take away here is: Resistance comes from the users themselves. No matter what the damper setting is, the user dictates the power applied in each stroke. You can work hard or light, it is ultimately up to you.
Other Details to Consider Outside of Damper Setting
Using proper technique on the RowErg and SkiErg is very important when it comes to erging at any stroke rate or damper setting. Whether you are going fast or slow, it is important to maintain proper form. When rowing, be efficient with your power by engaging your legs at the start of the drive, then swinging your back, and then following through with your arms. On the recovery, do not rush as you slide toward the handle for your next stroke. It is called “recovery” for a reason! Overall, your drive-recovery ratio should be 1:2. In other words, your recovery should take twice as long as your drive.
Review our RowErg technique video if needed and be sure to check out our video on Rowing with Greater Intensity.
People use many different techniques with the SkiErg. The technique linked below is based on the powerful and efficient double-pole technique used by cross-country skiers. Using this technique will ensure a low-impact, full-body workout for your upper body, core, and lower body. The technique is broken down into segments. Check out our SkiErg technique video.
Also remember, a damper setting of 6 on one erg may be a 4 on another. Elevation, air temperature, and the cleanliness of the flywheel can all impact the way each machine feels comparatively. While the damper setting adjusts airflow to the flywheel, to accurately compare two ergs, you will want to view the Drag Factor. To check drag factor, go to your monitor, select “More Options” and then “Display Drag Factor.”
For reference:
A brand new RowErg will have a drag factor of 90 or less at a damper setting of 1 and 200 or more at a damper setting of 10.
A brand new SkiErg will have a drag factor of 55 or less at a damper setting of 1 and 150 or more at a damper setting of 10.
For all of you Concept2 BikeErg® fans, we will have a separate blog post coming soon on damper settings. Stay tuned!
Recent Posts
Tags:

