Email: [email protected]Phone: 800.245.5676
/support/indoor-rowers/rowerg/how-to-videos
RowErg Assembly and How To Videos
The videos in this section are designed to help you with your RowErg.
The RowErg with Standard Legs requires the installation of the front legs using a total of eight screws. We include the necessary tool and clear, illustrated instructions. Allow about 20–30 minutes for the job.
RowErg Assembly Instructions (PDF)
The RowErg with Tall Legs requires the installation of the front legs using eight patched fasteners, and then the attachment of the rear legs using four additional fasteners. We include the necessary tool and clear, illustrated instructions. Allow about 20–30 minutes for the job.
RowErg with Tall Legs Assembly Instructions (PDF)
Connecting the front and back parts of the RowErg together is easy with the framelock mechanism. Make sure to have both parts sitting right-side up.
The device holder is standard on RowErgs starting between June and August 2021; exact timing varies by global market. It is integrated into the monitor arm, and requires the simple installation of a bottom support bracket.
Greg Hammond, a member of our Marketing team, demonstrates how to rebox a RowErg.
This video guides you through swapping the Chain, Axle, Sprocket and Shock Cord on your RowErg. These instructions can also be used for the Model C, Model D, and Model E Indoor Rowers.
Axle, Sprocket Replacement (PDF)
Chain Replacement (PDF)
Shock Cord Replacement (PDF)
This video shows you how to replace the foot straps on your RowErg. These instructions can also be used for the Model C, Model D, or Model E rowers.
This video will show you how to replace the foot stretchers and foot bellys on your RowErg.
This video shows you how to replace the generator coil on your RowErg. It also applies to Model D Indoor Rowers with the new Device Holder Arm.
Materials Needed
- phillips screwdriver
- 7/16” (11 mm) or adjustable wrench
- 5/32” (4 mm) allen wrench
Instructions
Gently remove the generator:
- Remove the generator cover from the generator base by removing two screws. The generator cover is located just past where the chain goes into the erg.
- Note the wire routing before you begin the next steps.
- Using the allen wrench and 7/16” wrench, loosen the two chain guide fasteners.
- Grasp the generator from each end and pull up and out.
- Continue to remove it by following the wire and pulling it out of the plastic clips as you go. You'll hear little snaps as you pop it out of the clips.
- Unplug the wire from the Performance Monitor (PM).
- Remove wire and generator coil unit.
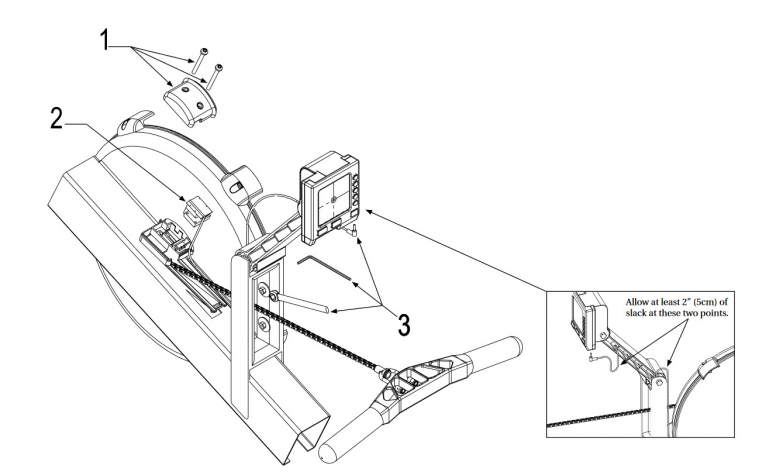
Next, you'll install the new generator.
- Insert it into the generator base with the green circuit board facing up and the wire trailing out towards the monitor arm.
- Replace the cover and install the two screws that hold it on.
- Route the wire the same way you removed it, back up to the monitor. Avoid bending, pinching or kinking the wire by allowing adequate slack (approximately 2 inches).
- As you reach the hinge point of the monitor arm, leave a little extra wire sticking out in a loop to allow easy movement of the monitor arm.
- Finish threading the wire up along the monitor arm, and then through it so that it comes out just below the PM.
- Finally, plug the wire into the PM, making sure you feel it click into place.
- Tighten chain guide fasteners.
This video shows you how to replace the seat rollers on your RowErg. These instructions can also be used for the Model C, Model D, or Model E rowers.
This video shows you how to adjust the shock cord on your RowErg. These instructions can also be used for the Model C, Model D, or Model E rowers.
This video shows you how to replace the shock cord on your RowErg. These instructions can also be used for the Model C, Model D, or Model E rowers.