SkiErg2 Maintenance
On a Regular Basis
Untwist the Cords
When you grasp the handles to use your SkiErg, you may be inadvertently twisting the cords, much like what would happen to the cord on a telephone hand set. Over time, this may cause the cords to twist around each other inside the SkiErg, resulting in a lumpy feeling when you pull on the handles. This may cause premature wear of the cord.
To avoid this, check the cords regularly and untwist them as needed. You will be able to see the twist in the cord; simply untwist by turning the handle in the opposite direction to the twist.
Follow this procedure periodically to untwist the cords. It will be easier if you have another person to help you.
- Pull out both handles as far as they go.
- Hold the cords at the top bracket allowing the handles to dangle and spin freely.
- Run your hand down the length of each cord to untwist the cord.
- Return the handles to the top position.
- Repeat the process starting at step 1 at least two times.
Clean Grips
Use a mild soap or cleaning product to clean the grips every few workouts as needed.
Every 500,000 Meters (Approximately 50 Hours of Use)
Inspect the Cords
There are two separate cords and two bungee cords to inspect. Important! Each cord is of a specific type and should be replaced with the appropriate Concept2 replacement cord if significant wear or damage is observed. See below for a description of cord wear/damage.
Cord Inspection
- Pull the handles all the way out to visually inspect the handle cords for wear.
- Inspect the cords working inside the vertical frame. Start by removing the lower right side cover by removing 8 screws, using the 6 lobe driver provided with your SkiErg. Once the cover is removed, all cords and pulleys will be visible.
- Have a helper slowly pull the handles all the way out and observe the condition of the handle cords and the bungee cord. You should be able to see the entire working length of all cords.
A Description of Cord Wear/Damage
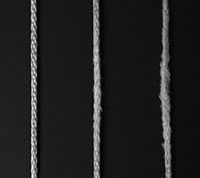
The handle cords consist of a solid braid (not a covering over inner fibers). Over time the surface will show fuzzing. If this fuzzing becomes worse in a localized spot on the cord it is time to replace the cord. See photo: From left-to-right the photo depicts a new handle cord; a handle cord with an acceptable amount of wear; a handle cord with excessive wear that needs to be replaced.
The bungee cord consists of elastic fibers encased in a braided covering. Some fuzzing of the covering is to be expected, but once the white fibers are exposed the cord should be replaced immediately.
We recommend replacing both cords at the same time.
Inspect the Fasteners
Be sure all fasteners are tight and have not become loose during use. If your SkiErg is wall mounted, examine the wall mount fasteners carefully.
Inspect the Top Bracket Pulleys
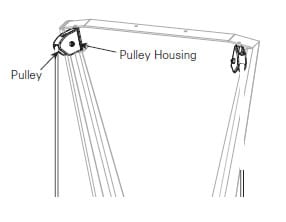
Be sure the pulleys spin freely in the pulley housings and that the pulley housings swing freely in the pulley brackets. See illustration.
As Needed
- Clean surfaces of the SkiErg, including floor or floor stand base, with any non-abrasive household cleaner. DO NOT spray any fluid onto the PM.
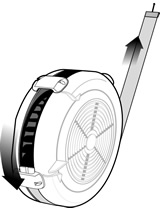
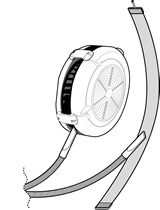
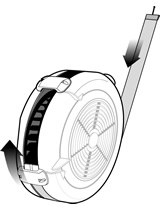
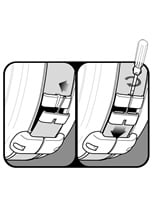
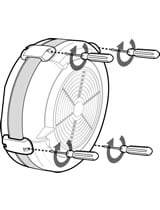
- Dust and lint can collect inside of the flywheel enclosure. This buildup can restrict airflow reducing the resistance of the fan. The outer cover of the fan enclosure can be removed for cleaning by removing the four screws that hold the cover together. See illustrations.
Step One
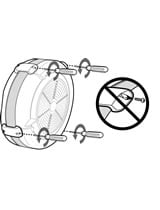
Step Two
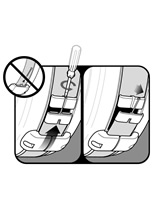
Step Three
Step Four
Step Five
Step Six
Step Seven
IMPORTANT: The Performance Monitor (PM) is a sealed unit. DO NOT TAKE APART. Any attempt to disassemble will void warranty. Contact Concept2 if there are problems with the PM.
Stay connected