Model D Troubleshooting and Repair
This page is designed to help you diagnose and fix problems with your Model D Indoor Rower. New problems may arise that are not discussed in this troubleshooting section. We would appreciate any information you may have to help us deal with these situations.
To obtain indoor rower schematics and detailed instructions for repair and/or replacement of parts, please visit the manuals and schematics page. If you need further troubleshooting assistance, please call Concept2 at 800.245.5676 (US and Canada), or email [email protected].
Black Residue on Monorail
Symptom
There is black residue on the top of the monorail.
Resolution
Black flecks on your rail are normal. They are a combination of dirt, perspiration, molydisulfide (a lubricant from the plastic rollers) and a very small amount of the nylon plastic that the rollers are made of. These four components are subjected to the mechanical action of the rollers and can dry and harden on the rail. To remove the black residue, clean the monorail. Wipe the monorail with a cloth or non-abrasive scouring pad after use. You can use soap and water or any glass cleaner. Do not use mineral acids, bleach or coarse abrasives.
Bumpy Seat
Symptom
Seat is bumpy or making clicking, ratchet-like sounds when rowing.
Resolution
This is usually caused by worn out seat rollers or by dirt on the seat rollers or the monorail. Clean the rollers and monorail. Replace the top seat rollers if problem persists.
Chain Problems
Symptom
The chain is skipping or running roughly.
Resolution 1
If caused by stiff links in the chain, you should clean and lubricate the chain. See Chain Lubrication (PDF). If the chain continues to skip, the machine should not be rowed and you should contact Concept2 immediately.
Resolution 2
If caused by a worn out sprocket, you should replace the sprocket. See Sprocket Replacement (RowErg, Model D and E Indoor Rowers) (PDF).
Note: When replacing a chain or a sprocket, Concept2 highly recommends replacing both the chain and the sprocket at the same time due to how these parts wear together over time.
Crack on Frame
Symptom
There is a crack forming at a particular point on the frame under the foot stretchers.
Resolution
This occurs due to susceptibility to metal fatigue. Applies to Model D and Model E Indoor Rowers shipped between August 1, 2006 and April 19, 2007. Click for product notice information.
Order a free Reinforcement Kit.
Handle Hangs Loose
Symptom
The handle does not retract all the way and is hanging loose.
Resolution
The shock cord is possibly too loose due to normal stretching or cold temperatures. Adjust the shock cord tension. See Shock Cord Adjustment (PDF). Replace the shock cord if it is frayed through the outer cover or if it is losing its elasticity. If the shock cord is cold, allow it to warm up.
Not Enough Resistance
Symptom
There is not enough resistance in the flywheel regardless of damper setting.
Resolution 1
You may not be generating enough power on the drive to feel resistance from the flywheel. The indoor rower generates resistance through moving air. The more air the fan moves, either by turning faster or by having more air available because of a more open damper, the harder it will be to spin the fan and the harder the resistance will be. By increasing your work output on the drive, you will be increasing your resistance. This can be proven out by doing the following: Try rowing at a low stroke rate (16–20 spm) and concentrating on rowing each stroke separately with lots of power on the drive, pushing hard with the legs. Try rowing like this at a damper setting of 10 for a minute or two, then 5 for a minute or two, then 1. Click for more technique help.
Resolution 2
The flywheel is dusty and needs to be cleaned out. See Flywheel Opening and Cleaning (RowErg, Model D and E Indoor Rowers) (PDF).
Seat Hits End of Track
Symptom
The seat hits the end of the track while rowing.
Resolution
This is more likely to happen when the athlete has long legs. It is possible that you will hit the end of the monorail while just sitting, but not while actually rowing. We recommend that you try a test row before making adjustments.
If you hit the end of the monorail while rowing with the seat rollers in the standard position, you can extend the travel distance of the seat by 1 inch:
- Use two 9/16" or 14 mm wrenches to loosen the bolt holding the rear top seat roller in the seat carriage.
- Remove the roller and hardware on the rear of the seat.
- Place the roller and hardware in the next hole over in the same order in which you removed it.
- Tighten the nut.
If this doesn't extend the seat far enough for you, please contact us to purchase an extended length monorail.
Seat Wobbles from Side to Side
Symptom
The seat wobbles from side to side on the monorail.
Resolution
After extended use, the fit of the seat on the monorail may become loose due to wear on the rollers. To adjust the fit, you can move the bottom rollers to a tighter hole toward the front of the seat as follows:
- Gain access to the bottom rollers by removing the seat from the monorail using one of the following methods:
- Disconnect the monorail from the flywheel (as you would for storage). Then, use two 9/16” or 14 mm wrenches to remove the top seat roller and slide the seat up to and off the front of the monorail.
- Use a 7/16” wrench and an Allen wrench to remove the top of the rear leg from the monorail, and then slide the seat off the rear of the monorail.
- Use a 9/16" wrench and an Allen wrench to loosen and tighten the bottom rollers.
Can’t Loosen Four Front Leg Screws
Symptom
Can’t loosen the four leg screws that attach the front legs to the box arm on the Model D Indoor Rower.
On Model D Indoor Rowers manufactured from June 10, 2016 to present, it may be difficult to remove the screws that attach the front legs to the box arm. To determine the age of your machine, inspect the serial number label. See this page for more information on serial number location: Model D.
Resolution
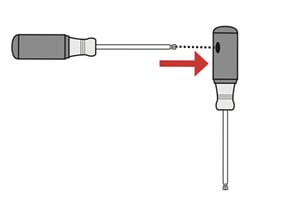
Separate the front end from the monorail. Turn the front end over so that the legs are pointing up. Insert a screw driver of any type into the hole in the handle of the supplied 6-lobe driver. This will be used to add torque to loosen the screws. See image below.

Insert screwdriver into handle of 6-lobe driver.
Seat the 6-lobe driver in the head of the screw and apply firm downward pressure, while turning with the other driver to loosen the screw. See images below.

Complete Loss of Resistance
Symptom
There is a complete loss of resistance during the drive. There is no noise associated with this loss of resistance.
Resolution
This usually means that the clutch is not engaging due to the lubricant within the clutch becoming contaminated or dried out, preventing the clutch from engaging. A new balanced flywheel assembly will fix the problem.
- Part number 1940 for Model D Indoor Rowers manufactured from July 2003–October 29, 2006
- Part number 2940 for RowErgs, Model D and E Indoor Rowers manufactured from October 30, 2006–present
Flywheels are not available for purchase on our website. Please call 800.245.5676 (US and Canada) to order.
Loose Foot Belly Screws
Symptom
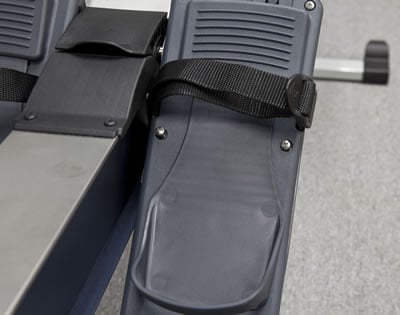
Foot belly screws loosen with use (see image).

Loose foot belly screws
Resolution
This issue affects Model D, E and Dynamic Indoor Rowers manufactured from March 13, 2015–August 27, 2015. To determine the age of your machine, inspect the serial number label. See these pages for more information on serial number location: Model D | Model E | Dynamic.
To resolve this problem, order and install a free Foot Belly Reinforcement Kit (part number 2795). Kit includes two triangular braces that reduce flexing of the foot belly during use, and 14 new style screws that are less prone to loosening. Order a free Foot Belly Reinforcement Kit.
Note: You will also need a Phillips head screwdriver and a 7/16" (11 mm) or adjustable wrench.
Foot Belly Reinforcement Kit Installation Instructions (PDF)
Stay connected