Email: [email protected]Phone: 800.245.5676
/support/monitors/pm3/troubleshooting
This section is designed to help you diagnose and fix problems with your performance monitor. To help minimize issues with your monitor, Concept2 recommends keeping your firmware current. Firmware releases are available at no charge from our website. Learn more
If you have questions or problems, or if you need further troubleshooting assistance, please contact us at 800.245.5676 (US and Canada) or [email protected].
Symptom
The Performance Monitor (PM) comes on and you can navigate the menus, but when you begin rowing or skiing, the monitor numbers stay at zero.
Resolution
- Ensure the “tach” (generator) cable is plugged in fully.
- On indoor rowers, ensure the model type on the monitor matches the indoor rower in use. Check this as follows:
- On the Main Menu, choose More Options.
- Choose Utilities.
- Choose Product ID. Look at what appears next to "Model." This should be D or D/E for Model Ds, and D/E for Model Es and Dynamic Indoor Rowers (for reference, D/E will also be listed for SkiErgs, but this procedure applies to indoor rowers only). If you have retrofitted a monitor to an older indoor rower, this should read C, B or A according to the indoor rower you have. If this doesn't match the indoor rower model you have, take the following steps:
- From the Main Menu, select More Options > Utilities > LCD Contrast.
- Press Change Units or Units three times.
- Press Change Display or Display three times.
- When the Set Rower Type screen appears, press the button next to Change Type until the correct indoor model is displayed:
- D or D/E for Model D Indoor Rowers
- D/E for Model E and Dynamic Indoor Rowers
- C, B or A as appropriate for the indoor rower you have, if you've retrofitted a monitor to an older machine
- Select Set Type to save the setting.
- Note: If you change the monitor batteries, you may need to follow this procedure again.
- If the problem persists:
- Unplug the monitor pickup wire and inspect it for frays or breaks. This is the wire that leads from the bottom of the monitor to the flywheel. If frays or breaks exist, the pickup wire will need to be replaced.
- Inspect the monitor pickup wire port on the bottom of the monitor. If there is a crack in the port, the monitor will need to be replaced.
- If the wire and port look fine, securely plug the wire back into the monitor.
- If the problem persists and you have access to a known working monitor, swap the monitors to determine whether the problem is with the monitor pickup wire or the monitor itself:
- If the known working monitor stays at zero when you begin your workout, the monitor pickup wire is faulty and must be replaced.
- If the known working monitor operates normally, the original monitor is faulty.
If you do not have access to a known working monitor, contact Concept2 or your authorized dealer for further assistance. If the monitor is used in a health club or other setting where a user may have sprayed the machine down with a cleaning solution after use, inspect the inside of the monitor and the circuit board for contamination. To inspect the inside of the monitor:
- Disassemble the monitor.
- Inspect the circuit board. If contaminants are visible, wipe down the circuit board with a cloth slightly dampened with water.
- Allow the circuit board to dry and reassemble the PM.
If the problem persists, or if no contaminants were visible on the circuit board, the PM must be replaced.
Symptoms
- Your Performance Monitor (PM) is warning you that the batteries are too low, but you think the batteries are OK.
- You’re using D cell batteries in your PM, and the battery life seems short.
Resolution 1
This resolution applies to PMs installed on the following equipment:
- Model D Indoor Rower
- Model E Indoor Rower
- Dynamic Indoor Rower
- SkiErg
Take the following steps to determine whether the problem is with the generator cable or the battery.
- Remove all batteries from the PM.
- Ensure the “tach” (generator) cable is plugged in firmly and all the way.
- Row/ski hard on your machine.
- If the PM comes on and stays on while you are rowing/skiing, then at least part of the generator is working. Proceed to step 4.
- If the PM does not come on, then generator cable needs to be replaced, and you can stop following this diagnostic procedure.
- Install fresh D cell batteries in the PM. The PM should power up.
- Set the language and date (the year, at minimum).
- From the Main Menu, select More Options > Utilities > Product ID.
- Look at the Model type. Make sure it is set to D or D/E.
- Press Menu or Menu | Back until you reach the Main Menu.
- Select Just Row/Ski.
- Start rowing/skiing:
- If the numbers begin counting, then the generator appears to be working. Proceed to step 12.
- If the numbers do not begin counting, stop this diagnostic procedure and replace the generator before proceeding.
- Stop, press Menu or Menu | Back while the flywheel is still spinning, and wait for 30–60 seconds. If you receive a low battery message, stop this diagnostic procedure and replace the generator.
Resolution 2
This resolution applies only to monitors in use with Model A, B, or C Indoor Rowers.
Under normal circumstances, a set of Alkaline D cell batteries should last in a PM3 for about 350 hours of operational time. If you find this is not the case, take the following steps:
- Check your firmware version: From the Main Menu: Select More Options > Utilities > Product ID. Running the latest version of the firmware may extend the life of batteries, as newer firmware uses the microprocessor more efficiently.
- Observe the performance monitor after rowing/skiing. The monitor should turn off within six minutes of the time you stop rowing (except when plugged into a computer, or during certain types of intervals). If it is not turning off within that timeframe, please contact Concept2 for assistance.
- Check the battery level: On the Main Menu select More Options > Utilities > Battery. Once the battery level gets down to about 80%, the battery percentage should not go down by more than 1% per day. If it does, there is probably damage to the circuit board and the unit should be replaced. In a health club, the most likely cause of this is spraying the monitor with cleaning chemicals.
Symptom
The port (or jack) for the USB cable is loose. This is the largest port on the bottom of the monitor.
Resolution
The USB cable port has broken off the circuit board. To resolve the issue, the PM must be replaced.
Symptom 1
The monitor powers up and displays information, but one or more of the buttons on the monitor face (usually the Menu or Menu | Back button) do not work.
Resolution 1
This is a hardware issue, usually caused by corrosion on the circuit board. The PM must be replaced.
Symptom 2
Not all buttons on the monitor face power up the monitor. Only pressing certain buttons or rowing/skiing will power up the monitor. After the monitor is on, some buttons may not work unless pressing hard.
Resolution 2
The keypad may be aging or worn and cannot make the connection. The PM3/PM4 keypad, part number 1451, should be replaced. See also:
If you have tried to update the firmware in your PM more than once and are encountering problems, follow the procedure below to reset the PM.
This topic applies to all PM3s, PM4s and PM5s when updating firmware using the Concept2 Utility and a USB cable.

- Simultaneously press and hold the Change Units button, as well as the first and fifth gray buttons on the right (see image).
- While holding these buttons, reset the monitor using a paper clip and the reset button on the back of the monitor.
- Release the buttons when the PM displays "Concept2 Flash Loader.”
- If the issue is not resolved, close and restart the Concept2 Utility. If the issue persists, try rebooting your computer and attempting the update again.
If you have performed the reset and are still encountering problems with the update, please note the PM screen contents (error messages, etc.) and contact Concept2 for assistance ([email protected] or 800.245.5676).
Note for MacBook Users: If you have attempted the update multiple times without success, try another USB port. Some MacBook users have reported that this resolved the issue. If the problem persists, contact Concept2 for assistance.
For additional firmware update troubleshooting, see Concept2 Utility Troubleshooting.
Encountering Errors
If you encounter an error during the firmware update, recover the PM by taking the following steps and trying again:
- Remove all other USB devices (printers, scanners, hubs, and so on) while updating your PM.
- Try connecting your PM to a different USB port. Concept2 recommends plugging in directly to a USB port on your computer and not using a hub.
- Try the update on another computer.
If you encounter a problem, we would like to hear from you. Please email [email protected] or contact Concept2 at 800.245.5676.
Symptom
The monitor does not come on at all or only shows a few vertical or horizontal black lines.
Resolution 1 (Does not apply to D cell batteries)
Fully recharge the battery pack using a computer:
- Ensure that the battery pack is installed in your PM. This resolution does not apply if you are using two D cell batteries in your PM. D cell battery users should proceed to Resolution 2.
- Power up the computer if it is off.
- Connect your PM to the computer with the USB cable that came with your monitor. The PM should power up within 10 seconds of connecting it to your computer. If this does not happen, press
Menu | Back on the PM. If the PM still does not power up, proceed to Resolution 2. - Leave the PM connected to the computer for eight hours or overnight. Your computer must remain on for the recharge to occur.
Resolution 2
Perform a full monitor reset.
Warning: Depending on the age of your monitor, resetting the monitor may delete all workout data from the PM Memory; workout data stored on a LogCard will not be deleted. Additionally, following a reset, you may need to re-program your monitor with the correct language, and the current date and time.
To perform a full monitor reset:
- Remove both D cell batteries or the battery pack from the monitor.
- Leave the batteries/battery pack out of the monitor overnight.
- Re-install the battery pack. If you are using batteries, install two fresh D cell batteries.
If the problem persists, the PM must be replaced.
Symptom
The monitor screen flutters with horizontal lines going across it. While the LCD is “fluttering,” other symptoms may be observed such as incorrect stroke output values, erratic strokes/minute display, inability to connect to PC or Mac or code 50 error.
Resolution
Replace the monitor.
Symptom 1
The monitor cannot read the LogCard and/or does not acknowledge an inserted LogCard at all.
Resolutions 1
Try the following resolutions in the order listed:
- Remove the LogCard and reinsert it.
- Loosen the battery door screw. If the screw is too tight, it can cause the PM3 case to warp so there is not enough pressure for the monitor to sense the LogCard.
- Ensure the monitor caseback screws are tight.
- Try inserting the LogCard upside down or backwards. This should cause an error on the monitor.
- If you get an error, the switch inside the monitor is working. Reinsert the LogCard correctly. If this does not cause any reaction from the monitor, then the LogCard is not hitting the switch. Inspect the LogCard to determine whether it's warped or bent. If so, replace it, or apply some gentle heat and pressure to flatten it out.
- If you do not get an error, then the LogCard is not hitting the switch. Contact Concept2 for additional assistance.
Symptom 2
The monitor displays "Cannot read LogCard" when the LogCard is inserted correctly.
Resolution 2
When this happens the problem is with the LogCard, not the monitor. You can try and repair the LogCard using the Concept2 Utility:
- Download and install the latest version of the Concept2 Utility on your computer.
- Launch the Concept2 Utility.
- Connect the PM to your computer with the USB cable provided with your PM.
- Insert your LogCard into the PM.
- Using the Concept2 Utility, transfer your LogCard data to a spreadsheet. During the transfer data function, the Concept2 Utility will detect and correct the errors associated with the LogCard. It does this by rewriting the card. When you are prompted to have the Concept2 Utility rewrite the card, select OK. Your data will be retained.
If the problem persists, the LogCard must be replaced.
Symptom 3
The LogCard suddenly loses workout history information. It may show total summary, but not specific monthly summary or individual workout information.
Resolution 3
The LogCard has been corrupted. Using the most recent version of the Concept2 Utility, go to Transfer Data > Transfer to Spreadsheet (or any option that requires the Concept2 Utility to read the LogCard). The utility will detect the errors and prompt you to rewrite the card. Select Yes. You will not lose any workout data.
For more information about LogCard rewrites, visit the Concept2 Utility Troubleshooting page.
Symptom 4
The LogCard is not recording any rowing/skiing data.
Resolutions 4
- If you typically do “Just Row” or “Just Ski” workouts, make sure your workout is longer than one minute in duration. Workouts that are less than one minute long do not get saved—either in the PM memory or on the LogCard.
- Make sure you press Menu | Back to return to the Main Menu before removing the LogCard. If you remove the LogCard before pressing Menu | Back, the monitor will record the information in Memory and not on the LogCard. This applies to “Just Row/Just Ski” workouts, “interval” pieces, and any pre-set workout where you do not finish the entire piece.
Symptom 5
The LogCard is not recording monthly totals.
Resolution 5
This can occur if workouts have been saved to the LogCard with future dates. (Having workouts with future/invalid dates occurs when the date on the PM is not set correctly. Learn how to set the date and time on your PM)
It is not possible to edit the dates on past workouts. The only resolution is to delete these workouts from your LogCard. (If you use an online logbook at log.concept2.com, manually enter those workouts in your logbook before deleting them from your LogCard.)
Once you've deleted the workouts from your LogCard, use the Concept2 Utility and go to the Transfer Data > Transfer to Spreadsheet option (or any option that requires the utility to read the LogCard). When it reads the LogCard, the utility will clean up any problems and reset your monthly totals.
Symptom
The monitor comes on and works, but there are thin horizontal or vertical lines of missing pixels across the screen.
Resolution
The LCD is broken and must be replaced. You can replace just the LCD, or, if you prefer, you can replace the entire monitor.
Symptom
While you are rowing or skiing, the monitor either resets to zero or freezes.
Resolution
Perform a full monitor reset.
Warning: Depending on the age of your monitor, resetting the monitor may delete all workout data from the memory; workout data stored on a LogCard will not be deleted. Additionally, following a reset, you may need to re-program your monitor with the correct language, and the current date and time.
To perform a full monitor reset:
- Remove both D cell batteries/the battery pack from the monitor.
- Leave the batteries/battery pack out of the monitor overnight.
- Install fresh batteries/reinsert the battery pack.
If the problem persists, the monitor must be replaced.
If you find a problem with the PM3 firmware that is not listed below, please email [email protected] so we can research it. Please tell us exactly what you were doing, what you observed, and what you expected to happen.
If you need help determining which list applies to your monitor, check your firmware version. Generally, if no resolution is listed for an older version of firmware, updating your firmware to the current version will resolve the issue.
Known Issues for Firmware Versions 303–311
Versions 310–311
There are no known issues for Versions 310 or 311 at this time.
Version 309
Symptom: Diagnostics start running unexpectedly.
Resolution: Upgrade to PM3 Firmware Version 310.
Versions 303–308
Issue 1: Error code 573-1 may occur when powering up the performance monitor.
Resolution 1: Update your PM3 firmware.
Issue 2: The PM3 flickers, fades, or shuts off when connected to a Mac that has HP printer/scanner or some other HP device software installed on it. If you are not sure whether you have HP device software installed on your computer, please email [email protected] for assistance.
Resolution 2: This issue is resolved in PM3 Firmware Version 306 Beta 1 and higher. Update your firmware.
Important: To successfully install the firmware, you will need to use either a Windows PC or a Mac that does not have the HP software installed on it. If you do not have access to another PC or Mac, you will need to uninstall the HP software to allow for the PM3 update. To uninstall the HP software, use the uninstall link for the HP software under Applications, or contact HP for instructions. You may reinstall the HP software after updating the PM3.
Known Issues for Firmware Versions 105 and Lower
Version 105
There are no known issues for Version 105 at this time.
Version 104
Issue: When accessing certain Information and Help screens, the monitor may display error code 42 or higher.
Resolution: Update your firmware. Until you are able to update the firmware, press Menu | Back to return to the previous screen and continue using the monitor.
Version 101
Issue 1: An infinite loop and/or a 44–94 error may occur when the following conditions are true:
- The monitor is on a "Just Row/Just Ski" workout
- The workout duration has just passed the two hour mark
- The monitor is showing the "All Numbers" workout view (the view that appears when you press the top grey button on the right of the monitor face during a workout)
- A LogCard is present in the monitor
If a LogCard is not present but the first three conditions are true, the monitor may present an infinite loop error and appear to reset, but will actually continue logging the workout.
Issue 2: If your PM3 is connected to a computer via the USB cable, and you stop rowing/skiing during a time interval of a variable interval workout (you must have stopped rowing/skiing long enough for there to be a period of inactivity on the PM3), the PM3 terminates the workout but does not return to the Main Menu.
Version 97
Issue 1: There have been rare reports of LogCards being inserted and being formatted, because the PM3 thinks that the LogCard is a factory fresh card. Version 101 has added a prompt before formatting cards.
Issue 2: LogCard corruption may occur when using third party software such as RowPro.
Issue 3: Aborted Variable workouts do not correctly log results to the LogCard.
Issue 4: Error 137–84 occurs when deleting the first user on a LogCard with multiple users.
Issue 5: The Add User and Edit User screens contained bugs.
Issue 6: A few issues with Venue Racing are present.
Issue 7: Various screen formatting issues are present.
Issue 8: PM3 Firmware Version 97 is not compatible with the Concept2 Utility Version 6.10. If you are planning to use your PM3 to interact with the Concept2 Utility Version 6.10, you will need to upgrade your PM3 to PM3 Firmware Version 101 or above.
Version 90
Issue 1: Variable interval workouts with no rest record the date incorrectly
Occasionally, variable interval workouts with no rest time will record the results on your LogCard with the next day's date. The problem occurs only with variable intervals with zero rest.
Issue 2: Error 65 occurs while trying to set up a workout
The PM3 workout setup screens erroneously allow you to set up a short time workout with a split time that is greater than the workout duration (that is, a 0:20 workout with a 1:00 split). This results in an Error 65. To avoid this error, ensure that the split time is not greater than the overall workout time.
Issue 3: After updating to V90 or V92 firmware, the PM3 date advances.
In some instances, the PM3 date advances one day following a firmware update to V90 or V92. If you have updated the firmware on your PM3 to V90 or V92, please check the PM3 date following the update to ensure the date is set correctly.
Version 82
Issue 1: Version 82 is NOT compatible with RowPro version 1.6 and below. RowPro 1.7 will support version 82. For more information about RowPro 1.7 please go to www.digitalrowing.com.
Issue 2: If you use the "List by Type" function to display your LogCard data or to select a workout to ReRow, and you continue to row while the PM3 is sorting the data on your card, the PM3 may display an error message. Removing and reinserting the LogCard will resolve the problem.
Issue 3: The Concept2 Utility versions 1.11 and below may not work with Version 82. You may need to upgrade to a newer version of the Concept2 Utility.
Issue 4: If a LogCard reaches 100% full, there is an issue with the PM3 that may cause loss of the last workout logged and possible corruption of other data on the card. This may render some or all of the data on the LogCard unrecoverable. To avoid this problem, we suggest you get a new LogCard when the LogCard you are using indicates that it is 95% full.
Version 61
Issue 1: If you do one of the following during an interval workout, you may experience incorrect interval numbering and incorrect data saved to memory or LogCard:
- Pause for more than six seconds during the work interval and then continue to row
- Stop rowing before the end of a time interval
- Start to row more than six seconds after the start of a work
To avoid problems using interval workout formats, continue to row at all times throughout the work intervals.
Issue 2: 240 and 39 errors
An error code 39 may appear when you are trying to access information from your LogCard. This is an indication that data on the LogCard has been corrupted.
Occasionally, the PM3 has trouble communicating with a LogCard. This happens very infrequently, but it can occur on any version of PM3 software. Concept2 is investigating this but no root cause has of the trouble has been determined. At this point the PM3 will report a 240 error. To enable the card to communicate again, remove and reinsert the card.
A few workouts after a 240 error is encountered the PM3 may report a 39-4 error when using the LogCard List By Date feature. Other LogCard features may also result in a 39-xxx error. This is an indication that there is a problem with the data on the LogCard. In most cases, workouts continue to be logged to the LogCard but cannot be reviewed by the user.
To fix a LogCard with 39-xxx error problems, upgrade to the newest version of the Concept2 Utility. Cards with only one user will be repaired automatically; multi-user cards will require a small amount of assistance from the user. Once the card is fixed, all the workouts should be available both on the PM3 and in a spreadsheet file on the PC.
Concept2 recommends upgrading to the newest version of PM3 firmware. This version will not prevent a 240 error. If a 240 error is encountered while logging your workout to the LogCard, the PM3 will display a prompt asking you to remove the LogCard. At this point the card should be undamaged and the workout can be found in the PM3 memory. The card can be reinserted, and the workout can be copied from Memory to the LogCard.
Issue 3: When setting up a PaceBoat using calories, the PaceBoat is not set correctly when the workout begins. You can set the pace using pace units (pace per 500m) or watts units. Once the workout has begun, the units can accurately be displayed as calories using the Change Units button on the PM3.
Issue 4: This issue relates only to the retrofit PM3 for Model C ergs. The stroke output can exhibit erratic numbers that are obviously incorrect. The output can be extraordinarily high or low from stroke to stroke.
Issue 5: If a LogCard reaches 100% full, an issue is present in the PM3 which may cause loss of the last workout logged and possible corruption of other data on the card. This may render some or all of the data on the LogCard unrecoverable. To avoid this problem we suggest you get a new LogCard when the LogCard you are using indicates 95% full.
The iConnectConcept2 cable (no longer available) is used to connect a PM3, PM4 or PM5 (wired PM5 connections only) to an iOS device for running applications such as ErgData. If you are having trouble connecting the iConnectConcept2 cable to your iOS device, the information on this page may help.
When ErgData prompts you to connect the Concept2 Cable, plug the iConnectConcept2 cable into your iOS device with the bulge facing the front of the iOS device (see image below). The message on ErgData should change to "Please connect the PM." If it does, follow the next prompt displayed. If it doesn’t, or if you are prompted for an update, read on.
When Prompted for an Update—What It Means
To facilitate communication between Concept2 monitors and iOS devices, the iConnectConcept2 cable itself runs firmware. This is separate from the firmware running the Concept2 monitors. The cable firmware is the brain that allows communication between the two devices (the PM and the iOS device) to occur.
When you first plug the iConnectConcept2 cable into the iOS device, it will check for current firmware and prompt you if an update is needed. If you get this prompt:
- Make sure the cable is NOT plugged into the Performance Monitor, and then accept the update. Even if you receive an error during the update, let the update finish, and move on to the next step.
- Once the update is finished, you will be instructed to remove the cable from the iOS device and re-insert it. If the update was successful, you will be prompted to connect a PM. If the update was unsuccessful, you will be prompted again to update the cable firmware. Attempt the update again. If it continues to be unsuccessful after several attempts, contact Concept2 for assistance.
When “Please Connect the PM” Doesn’t Appear
If you weren’t prompted for a cable firmware update, or if you were and you completed it, and “Please Connect the PM” still does not appear, take the following steps:
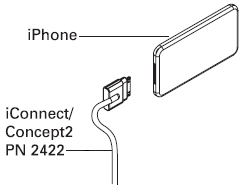
- Make sure that the cable is fully plugged in with the bulge facing the front of the iOS device (see image), and that it is plugged directly into the iOS device (remove any adapters, extension cables, etc.).
- Inspect the connector for damage.
- If you have an iOS device with a Lightning connector and are using a Lighting-to-30-pin adapter, ensure it is genuine Apple. Adapters not manufactured by Apple do not work.
- Check whether other accessories work when plugged into the iOS device.
- Turn the iOS device completely off, wait a few minutes, then turn it back on and try again.
- If the problem persists, contact Concept2.
When “Please Connect the PM” Appears but ErgData Doesn’t See the Connection
When a PM is successfully connected, ErgData will display “PM Connected.” Otherwise, it will continue to display “Please Connect the PM.” If you have plugged the iConnectConcept2 cable into both devices, but ErgData doesn’t recognize the connection, take the following steps:
Make sure the USB plug is oriented correctly (see image) and is not plugged into one of the networking RJ45 jacks.
- Inspect the cable for damage.
- Try connecting the PM via USB to a Windows computer to ensure that the USB port on the PM is working. If the PM cannot connect to a Windows PC, disconnect the USB, remove the PM batteries overnight, then try again.
- Make sure your PM firmware is up to date.
- If the problem persists, contact Concept2.
Symptom
When doing an interval workout the monitor appears to freeze after a certain number of intervals.
Resolution
You are using ReRow/ReSki. This repeats a prior workout with the PaceBoat/PaceSkier set to the speed of the earlier workout. ReRow/ReSki workouts will only have the same number of intervals as the original. If you want to do a larger number of intervals, you will need to create a new interval workout.
These error codes are associated with the LogCard or the PM Memory if no LogCard is used.
Resolution 1: If LogCard is Used
- Download and install the latest version of the Concept2 Utility on your computer.
- Launch the Concept2 Utility.
- Connect the PM3 to your computer with the USB cable provided with your monitor.
- Insert your LogCard into the monitor.
- Using the Concept2 Utility, transfer your LogCard data to a spreadsheet. During the transfer data function, the Concept2 Utility will detect and correct the errors associated with the LogCard, which it does by rewriting the card. When you are prompted to have the Concept2 Utility rewrite the card, select OK. Your data will be retained.
Resolution 2: If No LogCard is Used
- Perform a full monitor reset.
Warning: Depending on the age of your monitor, resetting the monitor may delete all workout data from the monitor memory; workout data stored on a LogCard will not be deleted. Additionally, following a reset, you may need to re-program your monitor with the correct language, and the current date and time.
To perform a full monitor reset:- Remove both D cell batteries or the battery pack from the monitor.
- Leave the batteries/battery pack out of the monitor overnight.
- Hold down the UNITS and DISPLAY buttons. While holding these down, re-install the battery pack. If you are using batteries, install two fresh D cell batteries.
- Update the PM3 firmware.
This error code indicates there is a problem with the LogCard format.
Resolution 1: Check LogCard and Machine
Check that you are not trying to use a SkiErg LogCard with an indoor rower or vice versa. Each type of LogCard is formatted specifically for its intended machine (SkiErg or indoor rower). Look at the front of the LogCard to determine what kind of card it is.
Resolution 2: Repair LogCard
Your LogCard's information may be damaged and need repair. You can do this using the Concept2 Utility.
- Download and install the latest version of the Concept2 Utility on your computer.
- Launch the Concept2 Utility.
- Connect the PM to your computer with the USB cable provided with your PM.
- Insert your LogCard into the PM.
- Using the Concept2 Utility, transfer your LogCard data to a spreadsheet. During the transfer data function, the Concept2 Utility will detect and correct the errors associated with the LogCard. It does this by rewriting the card. When you are prompted to have the Concept2 Utility rewrite the card, select OK. Your data will be retained.
This error occurs when the PM cannot properly compute the drag factor.
Resolution
Several situations can cause an error code 50:
- Plastic wrap around the flywheel.
- Very fast, arms-only rowing, especially with some older versions of Performance Monitor firmware.
- A dirty flywheel enclosure.
- An incorrectly programmed Performance Monitor.
If you are getting an error code 50, here are some steps to take:
- If this is a new machine, ensure that the plastic wrap has been removed from the flywheel.
- Make sure your PM is running current firmware. See PM4 Firmware for more information.
- Check the flywheel enclosure and clean out any debris. Refer to the following instructions:
For monitors on indoor rowers, ensure that your monitor is correctly programmed for the indoor rower model on which it’s installed: From the Main Menu select More Options > Utilities > Product ID. Look at what appears next to "Model." This should be D or D/E for Model Ds, and D/E for Model E and Dynamic Indoor Rowers. (For reference, D/E will also be listed for SkiErgs, but this procedure applies to indoor rowers only.) If you have retrofitted a monitor to an older indoor rower, this should read C, B or A according to the indoor rower you have. If this doesn't match the indoor rower model you have, take the following steps:
- From the Main Menu, select More Options > Utilities > LCD Contrast.
- Press Change Units or Units three times.
- Press Change Display or Display three times.
- When the Set Rower Type screen appears, press the button next to Change Type until the correct indoor model is displayed:
- D or D/E for Model D Indoor Rowers
- D/E for Model E and Dynamic Indoor Rowers
- C, B or A as appropriate for the indoor rower you have, if you've retrofitted a monitor to an older machine
- Select Set Type to save the setting.
Note: If you change the monitor batteries, you may need to follow this procedure again.
If the problem persists after performing these steps, contact Concept2 for assistance.
These error codes occur when the monitor is being used with external or third-party software.
Resolution
Error codes 120- through 129- occur when the monitor is being used with external or third-party software. If you receive this error, you should update the monitor firmware. With the exception of Concept2 ErgData, this error could also indicate a problem with the third-party software and not the monitor. If updating the monitor firmware does not resolve the issue, please report the problem to the software vendor.
For instructions on how to update your monitor firmware, please visit the appropriate page: PM3
This error occurs when powering up the performance monitor.
Resolution
Concept2 recommends updating the firmware in the monitor to the latest version. In the meantime, use one of the following resolutions to fix the problem.
- If you have not yet installed batteries in your performance monitor, do so now to resolve the problem.
- If your monitor already has batteries in it, you can resolve the issue by removing the batteries and unplugging the USB cable and leaving the batteries and cable out for 24 hours.
- If you need to get your monitor functioning quickly, instead of the 24 hour reset, you can perform the following factory reset. Just be aware that although performing the following reset will resolve the problem, it will also clear all memory (including lifetime meters) as well as any language, date, and time settings:
- On the face of the monitor, press and hold the Change Units and Change Display buttons, while pressing and releasing the Reset button on the back of the monitor.