Email: [email protected]Phone: 800.245.5676
/support/oars/how-to-videos-and-information
Oar How To Videos and Information
Watch as a member of our Regatta Service and Oar Manufacturing team demonstrates how to install a collar on an oar.
See page 6 of the Oar Manual for Collar Installation and Positioning
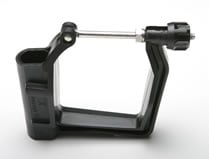
Each oar has a collar that consists of two pieces, which are essentially mirror images of each other. Small pegs on the ends insure that the pieces can only be put together with the proper orientation. Either side of the collar can face the oarlock; in fact, when one side wears out, you can rotate the collars to use the other side! A large stainless band clamp goes around both pieces to secure the collar onto the sleeve. See drawing.
Step 1: Installing the Collars
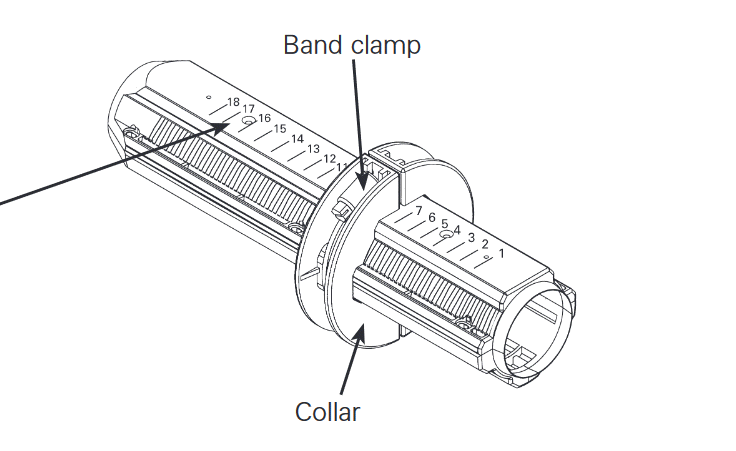
Loosely assemble the collar pieces and band clamp around the sleeve.
Note the centimeter scale on the back of the sleeve as a reference for your collar position.
Step 2: Positioning the Collars
Be sure the teeth of the collar are engaged evenly in the sleeve grooves at the desired setting, then tighten the band clamp firmly with a screwdriver.
- Do not overtighten the collar band clamp.
The band clamp should be tight enough to keep the collar teeth engaged in the sleeve grooves at the desired setting. Over-tightening may result in warping or damage of the collar.
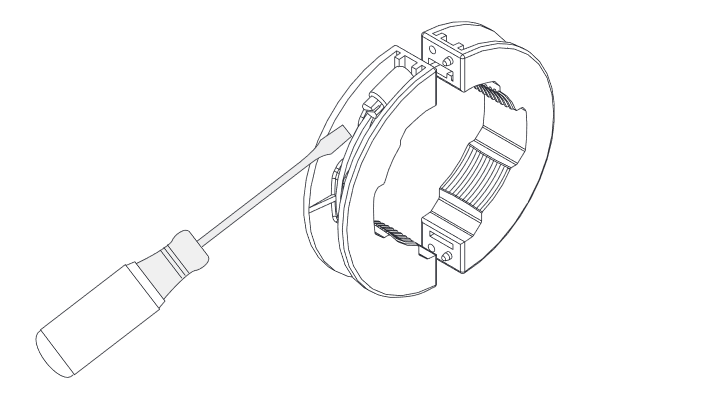
- The band clamp does the work.
- A slight gap is desirable.
Oar length, along with other variables like spread, blade size, blade type, inboard, catch angle, and so on, determine the boat gearing, also known as rig or rigging. For a given rig, a longer oar gives a higher gear (heavier load) than a shorter oar. Achieving a comfortable, effective rig is the key to keeping the load reasonable. In general, we recommend setting your oars or sculls shorter when rowing:
- With more efficient blades, like the Fat2.
- In a slower boat.
- With a narrower spread.
- With a longer reach/a greater catch angle.
- When you need less handle overlap while sculling.
Checking/Measuring Oar Length
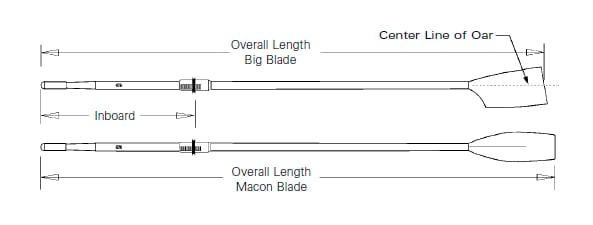
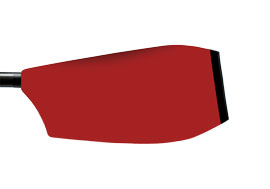
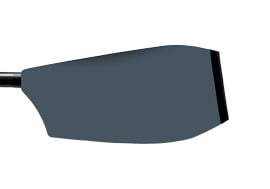
To check the overall length of your oars, measure the oar from the end of the grip to the end of the blade. If you have a hatchet-shaped blade (Fat2, Smoothie2 Vortex Edge, Smoothie2 Plain Edge, or Big Blade), continue your measurement through the center line of the oar through the blade. Refer to the image or video.
We ship adjustable oars at their shortest length. The length range of your oars is indicated on the invoice packed with the oars. To adjust your oars to the desired length:
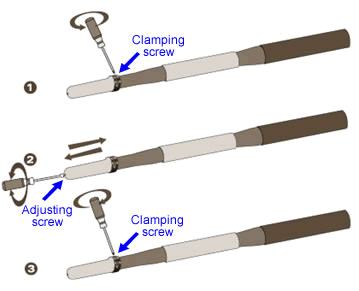
Obtain the proper tool for your oars:
- A T20 6-Lobe driver (available at hardware stores) for adjustable oars shipped 4/18/2011 or later in the US and Canada (4/21/2011 or later globally).
- A Phillips head or flat blade screwdriver to adjust the clamping screw, and a 6 mm (or ¼ inch) socket wrench/nut for the adjustment screw on adjustable oars shipped prior to the dates above.
- Loosen the clamping screw at the shaft end of the grip. Do not remove it; just loosen it by several turns.
- Turn the adjusting screw at the very end of the grip until you reach your desired length. Apply a little forward pressure on the screw as you turn it. Turn clockwise to shorten the oar; counterclockwise to lengthen it. It takes approximately four turns to move one centimeter.
- Tighten the clamping screw until snug to lock the handle into position. Do not over tighten.
Troubleshooting Adjustable Sweeps and Sculls
If the locking clamp of the adjustable grip is facing the rower’s chest, remove the adjustable grip and reinstall it by aligning the double keyway with the double key. When correctly installed, the locking clamp on the grip should be facing the same direction as the face of the blade.
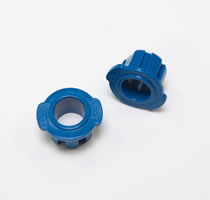
Concept2 oarlocks are compatible with replaceable bushings for pitch adjustment and pin fit. Different colored bushings fit different pin diameters as shown in the table.
| Bushing Color | Sweep | Scull |
|---|---|---|
| Black | 9/16 in | 1/2 in (and adapter*) |
| Blue | 13 mm | 13 mm |
| White | 1/2 in | 7/16 in |
| * Adapter for “crescent” type scull backstand fits into 1/2 in scull bushing. | ||
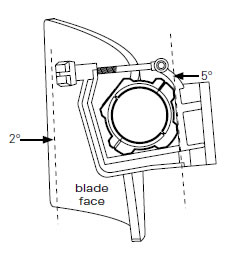
Universal Blue Bushings
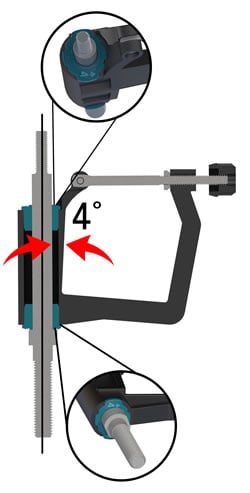
Our universal blue bushings provide 3–5 degrees of positive oarlock pitch. For four degrees (the most common), point the imprinted arrows toward the gate on both the top and bottom of the oarlock. For three or five degrees of pitch, face the desired pitch value toward the gate on the top and away from the gate on the bottom, similar to the white and black bushings. If you have a 13mm pin and are looking for 1, 2, 6, or 7 degrees of pitch, the traditional style blue rakes are still available. Please call Concept2 to order.
Black and White Bushings
Select two bushings with the desired pitch (1–7 degrees) and insert them in opposite directions to achieve desired pitch. The bushing with the desired pitch should be inserted with that number facing the gate on top and the opposite direction—away from the pin—on the bottom.
For checking and setting pitch at the sleeve, we recommend using the following methods, which are the same methods used at Concept2. Be sure to follow the appropriate method for the blade type you have. For simplifying the task, Concept2 sells an accessory Pitch Check*, which provides a level work surface and includes the necessary blocks for pitching various blade types. *The Pitch Check is not available for sale online; please contact us for more information or to purchase.
Pitching Fat2, Smoothie2, Big Blades and Macon Blades
This method applies to all blades made from the 2007 Smoothie2 mold and 1987 traditional hatchet blade mold, with or without the Vortex Edge.
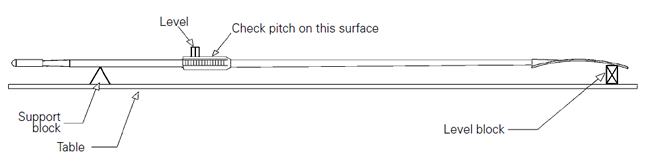
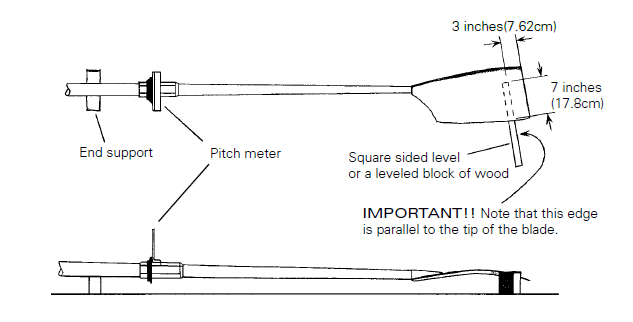
- Clamp a piece of wood or steel to one end of a bench or other stable structure. This block should have an even top surface and must be at least as long as your blade is wide.
- Use a bubble level and shims to level the block, then secure it to the bench.
- Position a support block (“V” blocks are helpful here) to hold the handle end of the oar off the bench.
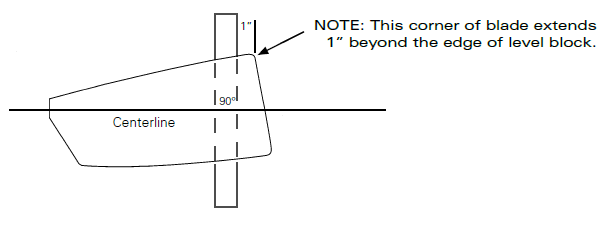
- Place the blade of the oar face side down on the block, with the short side corner of the blade extending one inch beyond the edge of level block. Note: The centerline of the oar must be perpendicular to the level block.
- Position your level on the wear surface of the sleeve. If the surface is level, then the oar has zero pitch. If the surface is not level, then raise one edge of the level until it shows level. This will show you how much sleeve material will have to be removed to correct the pitch to zero. You may fine-tune the pitch as much as one-half (0.5) degree by filing or scraping down the wear surface.
- Use an adjustable pitch level for checking oars with a designated pitch other than zero.
Oar must be level for pitching.
Pitching Method for Original Smoothie and Fat Blades
This method applies to all blades made from the 1996–2006 Smoothie mold (referred to as the Smoothie 1 mold), with or without the Vortex Edge. When measuring these blades, do not include the curved portion at the top of edge of the blade.
Oar must be level for pitching an oar.
Our standard procedure with blades from the Smoothie 1 mold was to ship them with the pitch set so the oar can be put into rigging that was set for a Big Blade, with no adjustment required.
Blades from the Smoothie 1 mold perform best with the flat surface of the blade pitched at 2 degrees during the drive. With our standard oars, this surface will be set at -3 degrees relative to the sleeve/oarlock. Therefore, if you use this oar in an oarlock pitched at 5 degrees, the result at the blade face will be the desired 2 degree pitch:
5° − 3° = 2° net pitch at the blade face
Resources
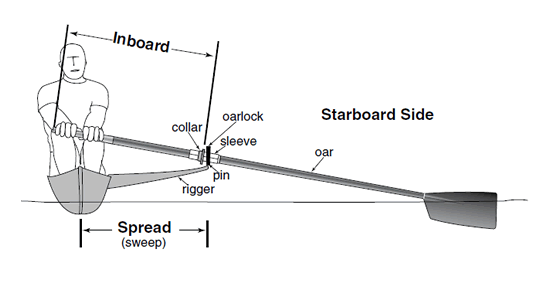
The inboard is determined by where you set the collar on the sleeve. Here are some basic recommendations for both sculls and sweep oars.
Sculls
Measure the spread of your boat (the distance between the pins that hold the oarlocks). Take half of this dimension and add 6–8 cm. This will give you a reasonable inboard dimension. Measure this distance from the end of the handle and position the collars at that point. Tighten the fasteners evenly and firmly.
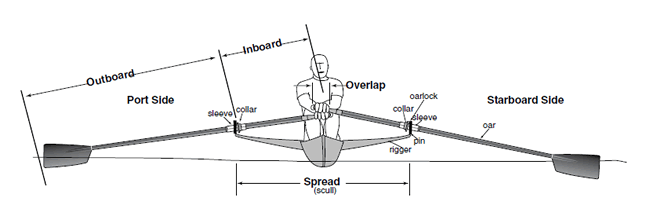
Sweeps
The spread of a sweep boat is the horizontal distance from the center of the boat to the center of the pin that holds the oarlock. To this dimension, add 29–31 centimeters to come up with a reasonable inboard dimension. Measure this distance from the end of the handle, and position the collars at that point. Tighten the fasteners evenly and firmly.
Watch how to set inboard and finish installing collars on your Concept2 Oars.
See page 6 of the Oar Manual for Collar Installation and Positioning
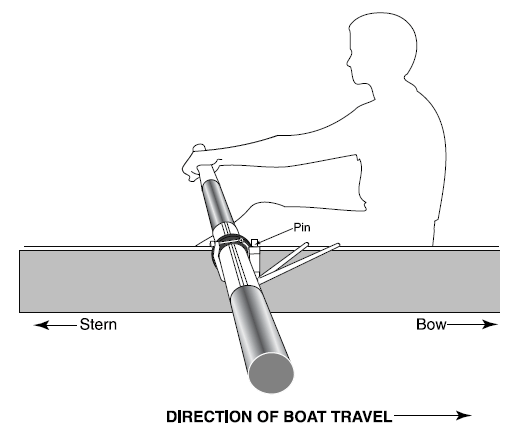
Once you have determined which side of the boat your oars go on, position them in the oarlocks as shown. Slide the oar in the oarlock by placing the narrow portion of the shaft near the blade into an open oarlock and slide the oar so that the collar meets the inboard side of the oarlock.
Important: Close the oarlock gate before getting into the boat. Failure to do this may result in the oar coming out of the oarlock unexpectedly and your boat flipping over. The oars should be able to rotate freely in the oarlock, but if they don’t, some adjustments can be made to open the oarlock up, depending on the particular make of oarlock. If you have trouble with the fit, please contact us for suggestions. Note that Concept2 makes oarlocks specifically designed to optimize the performance of our oars.
Be sure the oarlock opens toward the stern of the boat.
Cleaning Wood Handles
Wooden handles on sweep oars tend to accumulate oil and dirt over time. To clean and revitalize them, use a stiff bristled brush and scrub them with a solution of Ajax (or a similar cleanser) and water.
Grip Care
Proper care will extend the life of your grips, which can be replaced easily when they wear out. Refer to the cleaning methods below for the type of grips you have.
Cleaning Black Rubber and Blue Ribbed Grips
The black rubber and blue ribbed grips will age over time with exposure to sunlight. This may result in some of the surface layer of the grip material coming off on your hands as you row. To alleviate this problem, clean the grips periodically by scrubbing them with water and a non-abrasive pad.
Cleaning Blue Cellular Grips
Blue cellular grips need to be cleaned often to maintain their grip properties. If they feel slimy when wet, it is time to clean them. How often you need to clean your blue cellular grips depends on your rowing environment: warm, wet or dirty conditions necessitate more frequent cleaning. To clean your grips:
- Scrub the grips with a nylon brush (the type used for cleaning vegetables or fingernails) and rubbing alcohol, or scrub them with a diluted solution of bleach and water (approximately 10 parts water to one part bleach). Do not soak grips in the bleach solution. Cleaning the grips with bleach provides the added benefit of disinfecting them.
- Rinse the grips well with fresh water.
Cleaning and Caring for Microfiber Suede Grips
We advise gently cleaning your Microfiber Suede grips on a regular basis to extend the life of the Microfiber Suede patches. The patches are wearing items, but under normal use can be expected to last 6–12 months. It is important to store them out of direct sunlight and in a dry location. To maintain the smooth surface finish, avoid using tape on your hands or wearing rings while rowing. To clean your grips:
- Gently scrub the grips with a soft-bristled nylon brush and a solution of half water and half rubbing alcohol, or scrub them with a diluted solution of bleach and water (approximately 10 parts water to one part bleach). Scrubbing aggressively will damage the grip surface finish. Do not soak grips in either solution. Cleaning the grips with bleach or alcohol provides the added benefit of disinfecting them.
- Rinse the grips well with fresh water.
Cleaning Green Rubber and Orange Contoured Grips
These grips do not accumulate dirt as readily as the blue ribbed grips, but we still advise cleaning them occasionally. Use the method described for cleaning blue cellular grips.
Additional Information
- Grips are designed as a replaceable component part. Field life will vary depending on user care and maintenance, and rowing environment. Handles can also be replaced, but this involves more work.
- Be sure to wash your hands after applying sunscreen!
Note: The blue cellular grip is now discontinued.

It is important to keep sleeves, collars and oarlocks clean and grit-free in order to ensure smooth feathering action and long life. It is not necessary to lubricate these plastic components, but if you choose to, use a light silicone lubricant or WD-40. If you use oil or grease, wipe it off frequently. Oil and grease tends to attract and hold grit, which will prematurely wear the sleeves, collars and oarlocks.
You can significantly reduce collar wear by using CLAMS on your oars. Note that the collar is symmetric and can be used in either direction. When one side shows wear, extend its use by flipping the collar and using the other side.
When painting your blades, be sure to follow the instructions for the blade that you have.
Painting Carbon Fiber Blades
Painting Factory-Finished White Blades
(Blades finished with the standard white powder coat manufactured November 2009 to present or the standard white urethane manufactured 2007 to November 2009)
New blades are finished with an abrasion-resistant epoxy powder coat system at the Concept2 factory. With appropriate preparation, this finish is compatible with most other finish coats such as acrylic enamel, acrylic urethane, urethane, or epoxy paint. If you would like to change your blade color or apply additional paint or designs, prepare your blades for painting as follows:
- Using gray spray primer, apply a light dusting, or "guide coat," of primer on both sides of the blade from a distance of 18–20 inches. This will act as a visual guide when sanding and will expose any low spots or imperfections during the surface prep. Allow to dry for 5–10 minutes.
- With 220 grit paper, hand sand or use an orbital sander to sand both sides of the blade to a dull finish. (An orbital sander will provide the best prep with the least amount of effort.) IMPORTANT: Proper paint adhesion requires that the blades are thoroughly sanded.
- To sand by hand:
Start sanding in a corner of the blade. Work your way across the blade surface removing the previously applied guide coat. Sand the other side. - To sand with an orbital sander:
Sand the back surface of the blade up to and around the cone area. Hand sand the cone area. Sand the front of the blade.
- To sand by hand:
- Using rubbing alcohol on a lint-free cloth, wipe both sides of the blade to remove the sanding dust. Allow the alcohol to evaporate completely. IMPORTANT: Before priming and painting your blade:
- Mix and apply the primer/paint per the manufacturer’s instructions (see paint recommendations).
- Test the primer/paint on a small portion of the sanded blade to ensure that it does not bubble or easily scrape or peel off.
- DO NOT paint the Vortex Edge.
- Prime the blade with a primer that is compatible with the finish coat you are using. Follow the instructions from the primer manufacturer to prepare the primer.
- Mix the paint (and thinner if appropriate) per the manufacturer’s instructions. Using a bristle or foam brush, apply paint in light coats starting with the edges of the blade, making sure to smooth excess paint on both blade surfaces. Start at one end of the blade surface and apply the paint in smooth, even strokes. Allow the paint to dry per the manufacturer’s instructions before recoating to your desired finish. Note: One coat will not provide good results. We recommend lightly applying multiple coats. Applying thick coats may produce paint runs and improper curing.
Painting Factory-Finished Custom Colored Blades
(Blades finished with a custom paint color from Concept2’s Custom Urethane Color Option System)
New blades have been finished with a custom color from Concept2’s Urethane Color option system at the Concept2 factory. With appropriate preparation, these finishes are compatible with most other finish coats such as acrylic enamel, acrylic urethane, urethane, or epoxy paint. Prepare these blades for painting as follows:
- Sand the portion of blade to be painted with 220 grit sandpaper.
- Wipe the blade clean with alcohol or automotive paint degreaser.
- IMPORTANT: Test the paint on a small portion of your blade before painting the entire blade (see paint recommendations). Let the paint dry completely to assure proper adhesion. Be sure it does not bubble or easily scrape or peel off. If it does, please contact Concept2 for assistance.
- Spray or brush the rest of the blade with your finish coat of paint. If your oars have the Vortex Edge, DO NOT paint the plastic vortex edge cap.
Painting Blades Manufactured in 2006 and Earlier
The gray primer is designed to be finish-coated with automotive or marine grade acrylic enamel paint. Polyurethane is not compatible with the gray primer. Prepare gray blades for finish painting as follows:
- Sand the blades lightly with fine (220 grit) sandpaper.
- Wipe the blades clean with alcohol.
- IMPORTANT! Test the paint on a small surface of your blade before painting the entire blade (see paint recommendations). Let the paint dry completely to assure proper adhesion. Be sure it does not bubble or peel off, and then proceed with painting the rest of the blade.
- Apply a finish coat with automotive or marine grade acrylic enamel paint. If your oars have the Vortex Edge, DO NOT paint the plastic vortex edge cap.
Paint Recommendations for Carbon Fiber Blades
We recommend using one of the following products to paint Concept2 blades. These products are readily available online, in hardware stores, or at marine outlets.
For Best Overall Performance
Polyurethane–Single Part
- User-friendly; brush-on options available
- Limited color options
- Highly durable
Recommended brands:
- TotalBoat Brand (Wet Edge Topside) available online at jamestowndistributors.com.
- Interlux (Brightside) available online or at most marine outlets.
Alternative Options
Acrylic Enamel–Single Part
- Color options are readily available from most hardware stores (spray-on product)
- User-friendly
- Low durability
Epoxy–Two-Part
- Limited color options
- Compatibility issues when applying over existing paint
- LEAST user-friendly (Highly chemical-based product)
- Highly durable
Vinyl Recommendations for Carbon Fiber Blades
Many customers choose a solid color factory finish from Concept2, then add unique designs (such as stripes) with decals. New decal materials are easy to apply, replaceable, and don’t suffer from the “bubbling” typical of more traditional vinyl materials. Two products we recommend are 3M™ Wrap Film Series 1080 and Avery® WS900 Supreme Wrapping Vinyl Film, both of which can be found from many stores online (Concept2 does not sell material directly). We recommend testing any vinyl decals before racing.
Painting the Bantam Blade

The Bantam blade, standard on Bantam Sculls, is made of polypropylene, a similar thermoplastic as the bumpers on most cars today. You must use a paint system formulated for this type of plastic (also referred to as PP or TPO), or the paint will not stick. We recommend shopping at your local auto supply store for “bumper paint” for the base color of your blade. A bumper paint system may include a cleaner and an “adhesion enhancer” or primer. FOLLOW THE MANUFACTURER’S INSTRUCTIONS. We have tested these brands with good success:
- SEM®
- Dupli-color®
- Urethane Supply Company® brands
Test one side of one blade first before painting a fleet of blades. Follow the manufacturer’s instructions for how to add additional designs or stripes to your base color.
We have made your oars as durable as possible within the limits of creating a lightweight racing oar. Accidents do happen, and some of those accidents may damage your oars. Some kinds of damage can be easily repaired at home; other damage may require shipping your oars back to Concept2.
- Inspect your oars carefully after any mishap where the oar may have met excessive stress, load or impact. These mishaps may include catching a bad crab (particularly if the shaft impacts the rigger), hitting a bridge abutment, finding a big log in the river, or being improperly padded in transportation.
- Do a thorough inspection:
- Check for blade dents.
- Inspect the shaft for cracks or bruises. Feel for soft spots on the shaft that could indicate invisible cracks.
- Check for water in the shaft.
- It is important to catch damage as soon as possible. It can be dangerous to row with a damaged oar.
Shaft Damage
Shaft damage should be treated if the damaged area becomes soft or crackles when squeezed by hand, or if there is visible sign of damage covering more than 1/4 of the shaft diameter. It is possible for you to repair minor damage, such as longitudinal cracks, using fiberglass, which you can obtain from Concept2. Instructions are available and are generally included with the fiberglass.
In most other cases of shaft damage, it is advisable to return the oars to Concept2 for repair.
A shaft that has completely broken into two or more parts cannot be satisfactorily repaired. A "green stick fracture," where the oar pieces are still connected and most of the longitudinal fibers are intact, can usually be repaired. The repair, depending on the size and location of the fracture, may slightly affect the weight and balance of the oar.
Blade Damage
Blade damage most often occurs at the edge of the blade due to scuffing or hitting against something. This kind of damage can generally be repaired fairly easily with some sanding and epoxy. See our Blade Repair Instruction Booklet for step-by-step instructions. If there is more serious structural damage to the blade, it can be replaced. Please contact your local Concept2 representative for more information about blade replacement options.
Watch how to repair damage to an oar blade. Note: These instructions and video pertain only to carbon blades.
Note: This video applies to10 cm oar handles.
Do not store your oars long-term in continuous sunlight. Ultraviolet light will eventually degrade the surface and shorten the life of the oar.
Storing Oars with Wooden Handles
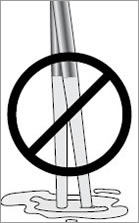
To store oars with wood handles:
- Keep the handles out of water and away from dampness.
- Do not store oars with wood handles on damp ground or in wet grass.
Transporting Oars
Most commercial car top racks, such as Yakima or Thule, are adequately coated to protect the oar shaft; however, unprotected tubular metal racks can cause serious damage to an oar shaft that is tied on without any padding. To help in transporting sculls, we sell an accessory Scull Case that will protect your sculls during travel, shipping or storage. It fits one pair of sculls, or two pairs with the collars removed.
- You MUST contact Concept2 (or your Concept2 Authorized Oar Distributor) for prior authorization before returning your oars for repair. We will need to know when to expect them. At that time, we will advise you of your shipping options. Quite often, a photograph can be helpful in diagnosing the problem.
- We will need to also discuss shipping logistics. In the box with the oars, please include your name, address, daytime phone or fax number and an explanation of the repair needed. We suggest that you remove and keep the collars.
As specified in the warranty statement, all shipping costs are the responsibility of the customer. You should prepay the freight charges to and from Concept2 or your local distributor.