Email: [email protected]Phone: 800.245.5676
/support/software/utility/how-to-use
How To Use the Utility Software
The Concept2 Utility is free software available from Concept2 that allows you to update the firmware in your PM3, PM4 or PM5, upload your workouts to your Online Logbook at concept2.com, and manage the data on your LogCard or USB flash drive. The high-level overview of how this process works is as follows:
- Install the Concept2 Utility on your computer and launch it.
- Connect the applicable device to your computer. This can be:
- A PM3, PM4 or PM5
- The USB flash drive that is used with the PM5
- A card reader with a PM3 or PM4 LogCard, if you’re not using a PM3 or PM4 to read the LogCard
- Use the functions provided in the Concept2 Utility interface to perform tasks such as uploading your workouts, deleting workouts, managing users and so on. Tasks such as updating firmware and uploading workouts to your online logbook require an internet connection.
Note: The instructions in this section are written for the latest version of the Concept2 Utility available. If you are not running the latest version, we recommend upgrading.

Connecting Devices
The Concept2 Utility works with several types of devices. The device you use depends on the equipment you have and the task you are trying to do. Here are the scenarios for which you’d connect a Performance Monitor to a computer for working with the Utility:
- You have a PM5 and want to either read workouts from the PM5 Memory or upgrade the PM5 firmware with the Concept2 Utility and a USB cable versus using the USB flash drive
- You have a PM3 or PM4 and want to upgrade the monitor’s firmware
- You store your workout data on a PM3 or PM4 LogCard and want to use the Performance Monitor instead of a card reader to read the LogCard
Connecting a Performance Monitor
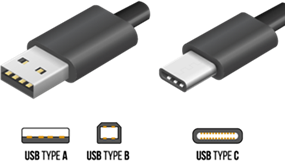
Connecting a Performance Monitor to a computer requires a generic USB cable that has a Type B plug on one end for plugging into the PM, and either a Type A or Type C plug on the other end for connecting to your computer. Please check your computer to see what type of USB plug it accepts. Refer to the image below for help.
Available on the Concept2 Online Shop:
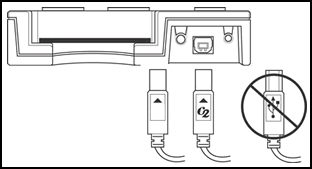
To connect your PM:
- Plug the flat end (the Type A or Type C plug) of the USB cable into a USB port on your computer.
- Plug the square end (the Type B plug) of the USB cable into the PM, taking care to insert the plug correctly (see image below). On a PM3 or PM4, the USB cable port is on the bottom of the monitor; on a PM5 this port is on the back of the monitor.
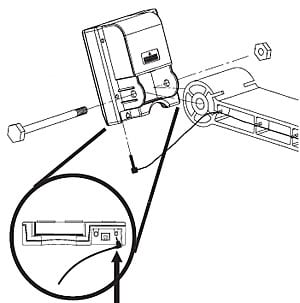
If you need to remove the PM from your indoor rower or SkiErg:
- Unplug the monitor pickup cable from the bottom of the PM.
- Remove the bolt that fastens the PM to the machine.
- Remove the PM from the machine.
Refer to the image below. Depending on which machine you have, the components may look a little different, but the general idea is the same.
Installing Drivers
The first time you connect a PM to a Windows computer, you may be prompted to install a driver (a program that allows your computer to interact with the PM) for the “USB Device.” Follow the prompts and accept the default selections. Some versions of Windows may require the Windows Operating System CD to complete driver installation.
The PM5 works with USB flash drives (FAT and FAT32 USB formats only) to store results, perform firmware updates and more. This USB flash drive works just like other USB flash drives you may have used: insert it into any USB port on your computer. You can then use the Concept2 Utility to manage the data on the drive.
Prior to using the USB flash drive to store results or perform firmware updates, it must be initialized. You can initialize it either with the PM5 or the Concept2 Utility. Steps for each method follow. For more information about what occurs behind the scenes during initialization, refer to USB Flash Drive Overview.
Initializing a USB Flash Drive with a PM5
- Insert a USB flash drive into the PM5.
- When prompted for a user name:
- Choose plus or minus to scroll through the alphabet as needed.
- Choose the right and left arrows to navigate through the various characters of the name.
- Select the checkmark icon to save the changes.
Initializing a USB Flash Drive with the Concept2 Utility
You must be running Concept2 Utility Version 7 or higher to follow this procedure.
- If the USB flash drive you want to initialize is inserted into your computer, remove it before proceeding.
- Establish an internet connection.
- If you have not already done so, download and install the Concept2 Utility, and then run it.
- On the main Concept2 Utility screen, click Update Firmware.
- When prompted to select a Performance Monitor, select PM5.
- Insert the USB flash drive into your computer.
- When prompted, enter a user name in the User Name field.
- Click Ok. The initializing process takes a few seconds; the Concept2 Utility will notify you when the process is complete.
- Click Ok to return to the Concept2 Utility main screen. You can now begin using your USB flash drive with your PM5.
Uploading/Transferring Results
At concept2.com, you can create a free online logbook for storing your meters and participating in online challenges. To save you from having to hand-key your results into your online logbook, you can use this option to upload your result data directly to your online logbook.
To use this option, you will need a working internet connection, an online logbook at concept2.com, and one of the following:
- A USB flash drive or a LogCard with results on it
- A PM5 with results in Memory
We also recommend having your online logbook username, password and Ranking ID handy before using this option. Your Ranking ID is your unique identifier in our online logbook database. You can find your Ranking ID by logging into your online logbook, clicking the person icon on the upper right corner of the screen and clicking Profile.
Uploading Results
- Establish an internet connection.
- If you have not already done so, download and install the Concept2 Utility, and then run it.
- On the main Concept2 Utility screen, click Upload/Transfer Results. If your device is already connected to your computer, skip to step 6.
- Select the type of device on which your results are stored.
- Attach the device you selected in the previous step to your computer, as applicable:
- Insert your USB flash drive into your computer
- Attach your PM5 to your computer using a standard USB cable
- Connect your PM or card reader to your computer and insert your LogCard into it
- Select Upload to Online Logbook. The utility will read the device.
- When the utility has read the device, you should see a list of all the results saved for the user on the USB flash drive or PM5 memory or a list of all the LogCard Users and their results from the LogCard (each LogCard can have up to five users). If the information next to your name is an ID number followed by your ranking username, then you've already linked your online logbook to the Concept2 Utility for the purposes of uploading data. If the Ranking ID and username is incorrect, or if "Click to Log In" appears next to your name, you will need to link your online logbook. Note: Because PM5 Memory does not store your username or Ranking ID, you will need to link your online logbook every time you want to upload your results from the PM5 Memory. To create the link:
- Click Click to Log In. The Concept2 Utility displays the Link Your Online Logbook window.
- In the Username field, enter the user name you use to log into your online logbook at log.concept2.com.
- In the Password field, enter the password you use to log into your online logbook at log.concept2.com.
- Click Get Ranking ID. If you have entered your user name and password correctly, the utility will retrieve and display your Ranking ID. Verify that the Ranking ID retrieved matches the Ranking ID from your online profile. If it doesn't, or if you cannot create the link, contact Concept2 for assistance.
- Click OK.
- The utility compares the result data it read from your device with the results you have already posted in your online logbook. It grays out any results that are already in your online logbook, so that a duplicate isn't uploaded.
- For each result you want to upload, make the appropriate selections in the S, D and LWT columns, as follows:
- Check the S (Slides) column if the workout was done using Slides on a Model A, B, C, D or E Indoor Rower.
- Check the D (Dynamic) column if the workout was done on a Dynamic Indoor Rower.
- Check the LWT (Lightweight) column if your weight class for this result was lightweight. (<=135 lbs (61.5 kg) for women; <=165 lbs (75 kg) for men)
- For each result you want to upload, click the checkbox to the left of the result. (To quickly select all eligible results for a user, click the checkbox to the left of the user name.)
- Click Upload Results.
Note: Following an upload from a PM5, results will remain in PM5 Memory unless you delete the results from the monitor itself.
In addition to seeing completed results and uploading them to your online logbook, you can perform the following tasks when viewing a list of results in the Concept2 Utility:
- Print the contents of the window
- Show/hide splits and intervals
- Show/hide all information
- Set machine type and weight class defaults
Printing the List of Results
The Print button available when viewing the list of results generates a paper version of the information displayed. For example, if you have expanded the splits for a particular user, the splits will be expanded for that user on the print out. If you have collapsed a user's workouts so that just the user's name is displayed in the list, then that is how the resulting print out will look.
Showing/Hiding Splits and Intervals
Results information generally appears with the splits and intervals hidden by default. To view them, either click the plus button* next to a particular workout (click it again to hide the information) or:
- Right click the workout.
- Click Show splits/intervals in the menu that appears after right-clicking. (Click Hide splits/intervals to hide the information.)
*Note: This may appear as a right arrow in some operating systems.
Showing/Hiding All Information
To show all the workout information (including splits and intervals) for all users, right-click in the list of results and click Show All. Right-click in the list of results and click Hide All to collapse all workout information and show only the list of users.
If you plan to use the Concept2 Utility frequently to upload your results to your online logbook at log.concept2.com, setting defaults for machine type and weight class will save you from having to correct/edit information in your online logbook after you upload results; it will also save you from having to make these selections for every result in the list prior to upload. You can always change these selections for a particular result if they don't apply to it.
To access these settings:
- Follow steps 1–7 of Uploading Results to an Online Logbook.
- Next to your Ranking ID and user name in the list of results, click [Result Settings].
- On the Set Machine Type and Weight Class window, select the machine type you usually use:
- Select Indoor Rower if you typically use a Model A, B, C, D or E Indoor Rower without Slides.
- Select Slides if you typically use a Model A, B, C, D or E Indoor Rower with Slides.
- Select Dynamic if you typically use a Dynamic Indoor Rower.
- Under Weight Class, make the selection that applies to the majority of your results (applicable for indoor rowing workouts only). As with the Machine Type setting, you can edit this for a particular result if your weight class was different that day.
- For women, lightweight is <= 135 lbs (61.5 kg); heavyweight is > 135 lbs (61.6 kg).
- For men, lightweight is <= 165 lbs (75 kg); heavyweight is > 165 lbs (75 kg).
- Click OK. In the list of results, the Concept2 Utility will automatically tick the appropriate checkboxes in the S (Slides), D (Dynamic) and LWT (Lightweight) columns for each result listed.
When transferring data from your USB flash drive or LogCard to a spreadsheet, the type of file the utility creates is a .csv file (for example, LogCard.csv). A .csv, or Comma Separated Value file, is a type of file in which the data is delineated, or separated, by commas. In other words, the commas tell a software program where the different data elements begin and end.
The utility creates a .csv so that you are not restricted as to what type of program you need to read the file. Microsoft Excel, as well as other programs such as Microsoft Works or Access, can import and read .csv files. When opening a .csv file, you may be prompted by a Text Import Wizard to indicate how the data is delineated in the file. If this occurs, make the appropriate selections to indicate the data is delineated by commas.
To view the resulting file created with the Transfer to Spreadsheet option, you will need to have a program installed on your computer that is capable of opening .csv files. If you do not have a program on your computer with this capability, and you simply want to view the information on your USB flash drive or LogCard, click Upload/Transfer Results and then click Upload to Online Logbook. The utility will read the USB flash drive or LogCard and display the information, which you can then print if you choose.
The Transfer to Spreadsheet option transfers all the data on your USB flash drive or LogCard (you cannot transfer only certain pieces of information), including heart rate information if you are using the appropriate equipment to display heart rate data on the Performance Monitor during your workout. Please note that the Transfer to Spreadsheet option will overwrite previously transferred data if you transfer data to the same file. Additionally, the Transfer to Spreadsheet option will not work if you are transferring to a file that you currently have open on your computer. In this case, close the file before doing the transfer, or change the name of the file the Concept2 Utility will create.
View a sample spreadsheet(PDF)
You cannot upload results to your online logbook from a .csv. Additionally, you cannot transfer data back onto a USB flash drive or LogCard using a .csv.
Take the following steps to transfer the data to a spreadsheet:
- If you have not already done so, download and install the Concept2 Utility, and then run it.
- On the main Concept2 Utility screen, click Upload/Transfer Results. If your device is already connected to your computer, skip to step 5.
- Select the type of device on which your results are stored.
- Attach the device you selected in the previous step to your computer, as applicable:
- Insert your USB flash drive into your computer
- Attach your PM5 to your computer using a standard USB cable
- Connect your PM or card reader to your computer and insert your LogCard into it
- Click Transfer to Spreadsheet.
- The Concept2 Utility displays the default location and the name of the data file it will create.
- To change a file location, click Browse, and select a new location/file on your computer.
- To change the name of the file that will be created, type a new file name in the Spreadsheet file name box, but leave the “.csv” extension.
- If you want to view the results immediately following the transfer, select Open file in Excel after reading data. (This may appear as "Open file in External Application" if Excel is not installed on your computer.)
- Click OK to transfer the data.
If you chose to have the utility automatically open the file and Excel is installed on your computer, the utility will launch Excel and display the spreadsheet created by the Transfer function. If Excel is not installed on your computer, the utility will prompt you to select the application you would like to use to display the spreadsheet created by the Transfer function. (If you have already set your computer to open .csv files in a particular application, the utility will use that application to open and display the file.)
If some of the data is not visible or appears as ###### when viewing the data in a spreadsheet, the data is too wide for the column. Widen the spreadsheet column to see the data in its entirety.
Updating Firmware
Maintenance and Settings
This function allows you to fully reload the current firmware onto your PM if recommended by Concept2 Technical Support.
- Launch the Concept2 Utility.
- On the main screen, click Maintenance and Settings.
- Click Perform Monitor Maintenance.
- Select PM3, PM4 or PM5 as appropriate for the monitor you want to maintain. If your monitor is already connected, skip to step 6.
- Use a USB cable (standard printer cable) to connect the monitor to your computer.
- Click Fully Reload Firmware.
- The Concept2 Utility checks the firmware currently installed on the Performance Monitor and will indicate whether an update is available. If your monitor firmware is current, the Concept2 Utility will let you know that as well.
- Click Install Vxxx where xxx is the firmware version number you're about to install. If a beta firmware version is available and you want to install it instead, click the Install Beta Firmware link.
Beta Firmware Note: Beta Firmware is the prototype for a new firmware version before its official release. Beta Firmware may include new features and fixes for issues discovered in current versions.
The update takes several minutes. During the update, the Concept2 Utility displays a progress indicator and will let you know when the process is complete.
This function allows you to send a unique diagnostic email to Concept2 in order to diagnose monitor problems and upload data for analysis.
- Launch the Concept2 Utility.
- On the main screen, click Maintenance and Settings.
- Click Perform Monitor Maintenance.
- Select PM3, PM4 or PM5 as appropriate for the monitor you want to maintain. If your monitor is already connected, skip to step 6.
- Use a USB cable (standard printer cable) to connect the monitor to your computer.
- Click Diagnose Monitor Problems.
- Enter your email address if you would like a reply from Concept2.
- Describe the problem in the space provided, then click Send. If you entered an email address identifying yourself, you will receive a reply from the Concept2 Technical Support team within 1–2 business days.
This function allows you to repair errors in your log data on a USB Flash Drive (PM5 only), in the PM5 Memory, or on a LogCard (PM3 and PM4 only).
- Launch the Concept2 Utility.
- On the main screen, click Maintenance and Settings.
- Click Manage Stored Results.
- Select USB Flash Drive, PM5 Memory or LogCard as appropriate for the device you want to manage. If your monitor and device are already connected, skip to step 6.
- Use a USB cable (standard printer cable) to connect the monitor to your computer or insert your USB Flash Drive into your computer.
- Click Repair Data.
- The Concept2 Utility will begin reading the data, will repair any errors it finds and let you know when it's complete.
This function allows you to backup your log data to a file on your computer.
For PM3 and PM4 users: When creating a backup file of your LogCard data, the type of file the utility creates is an .lcb file (for example, LogCard.lcb). You can use the .lcb file to restore data to a LogCard, if needed.
- Launch the Concept2 Utility.
- On the main screen, click Maintenance and Settings.
- Click Manage Stored Results.
- Select USB Flash Drive, PM5 Memory or LogCard as appropriate for the device you want to manage. If your monitor and device are already connected, skip to step 6.
- Use a USB cable (standard printer cable) to connect the monitor to your computer or insert your USB Flash Drive into your computer.
- Click Make a Backup.
- The Concept2 Utility displays the default location and the name of the data file it will create.
- To change a file location, click Browse, and select a new location/file on your computer.
- To change the name of the file that will be created, type a new file name in the file name box. If using a LogCard, leave the “.lcb” extension.
- Click OK to create the backup file.
This function allows you to restore data from a backup file on your computer to a USB Flash Drive (PM5 only), the PM5 Memory, or a LogCard (PM3 and PM4 only).
- Launch the Concept2 Utility.
- On the main screen, click Maintenance and Settings.
- Click Manage Stored Results.
- Select USB Flash Drive, PM5 Memory or LogCard as appropriate for the device you want to manage. If your monitor and device are already connected, skip to step 6.
- Use a USB cable (standard printer cable) to connect the monitor to your computer or insert your USB Flash Drive into your computer.
- Click Restore Data From Backup.
- The Concept2 Utility displays the default location and the name of the data file it will select.
- To change a file location, click Browse, and select a new location/file on your computer.
- To change the name of the file to select, type a new file name in the file name box. If restoring LogCard data, leave the “.lcb” extension.
- Click OK to restore the data.
This function allows you to delete results from a PM3/PM4 LogCard, the PM5 Memory, or USB Flash Drive. This will only delete results. It will not delete users, Lifetime Meters or Favorite Workouts.
- Launch the Concept2 Utility.
- On the main screen, click Maintenance and Settings.
- Click Manage Stored Results.
- Select USB Flash Drive, PM5 Memory or LogCard as appropriate for the device you want to manage. If your monitor and device are already connected, skip to step 6.
- Use a USB cable (standard printer cable) to connect the monitor to your computer or insert your USB Flash Drive into your computer.
- Click Delete Results.
- Select the LogCard or USB Flash Drive user you want to work with, or PM5 Memory.
- Select either Delete ALL of the user's workout data or Delete all workouts before: and indicate the date.
- Click OK to delete the selected results.
This function allows you to change the type of machine the monitor will be used with (SkiErg, Indoor Rower Model A, B, C, D, E or Dynamic).
- Launch the Concept2 Utility.
- On the main screen, click Maintenance and Settings.
- Click Perform Monitor Maintenance.
- Select PM3, PM4 or PM5 as appropriate for the monitor you want to maintain. If your monitor is already connected, skip to step 6.
- Use a USB cable (standard printer cable) to connect the monitor to your computer.
- Click Convert Monitor Type.
- Select the machine type you want to convert the monitor to.
- Click OK. The Concept2 Utility will begin converting the monitor. The conversion takes several minutes. The utility displays a progress indicator will the conversion is occurring and will notify you when the conversion is complete.
On most monitors, all available languages are installed when the firmware is updated. On some monitors, however, not all of the languages can fit in the monitor memory. This option allows you to specify the language you want to ensure is installed on your monitor.
- Launch the Concept2 Utility.
- On the main screen, click Maintenance and Settings.
- Click Concept2 Utility Settings.
- In the Language section of the Settings screen, click the dropdown and select the language you want to ensure is included on your monitor.
- Click Ok.